The Power Of Branded Gift Bags For Luxury Brands
The Power Of Branded Gift Bags For Luxury Brands
A branded gift bag has one job before it carries anything: make the right impression.
For luxury beauty, fashion, and jewellery brands, that impression begins with proportion, colour, print, structure, and the way the handles sit against the design. A beautifully printed logo loses its impact if it disappears beneath a handle knot. A dramatic side gusset becomes less useful when important artwork folds out of sight.
The strongest luxury branded gift bags are designed as complete objects, not flat artworks wrapped around a bag shape.
Intelligent packaging design considers every visible panel, fold, handle, opening, and carrying position. This helps brands create eye-catching branded gift bags that look polished in-store, in customer photographs, at events, and throughout the wider unboxing experience.
Immediate impact is not about adding more decoration. It is about making every detail land properly.
Want to learn more about what’s possible with branding?
Explore The Branding Hub →
What Makes A Branded Gift Bag High Impact?
A high-impact branded gift bag combines clear branding, balanced panel layouts, appropriate materials, well-positioned handles, and a structure that performs throughout filling, carrying, opening, and reuse.
The strongest designs usually include:
A clear front-panel focal point.
A grid that accounts for folds, handles, and construction areas.
Branding that remains visible when the bag is carried.
Side gussets used deliberately.
Materials and handles suited to the product weight.
Colours and finishes that support the wider packaging system.
A specification that can be produced consistently at scale.
The result should feel unmistakably branded before the customer has even looked inside.
Why Branded Gift Bags Matter For Luxury Brands
Gift bags are often one of the most visible elements in a retail or gifting experience.
They may appear:
At a beauty counter.
Across a fashion store.
In customer social content.
At product launches.
During press events.
In hotel rooms.
At corporate gifting moments.
On the journey home.
In the recipient’s later storage or reuse.
This visibility gives customised gift bags a role beyond simply carrying a product.
They can help:
Reinforce brand recognition.
Create a premium handover moment.
Connect several products within one purchase.
Support seasonal campaigns.
Add perceived value to gifting.
Turn standard retail packaging into something more memorable.
Extend the brand experience beyond the store.
Encourage reuse when the structure and design support it.
A gift bag becomes a moving piece of brand communication. It deserves more thought than “logo in the middle and hope for the best”.
Start With The Bag Structure
Packaging design should begin with the physical bag, not the artwork.
Before placing a logo, confirm:
Finished width.
Finished height.
Gusset depth.
Turnover at the top.
Base construction.
Handle type.
Handle position.
Handle knot or fixing area.
Board or reinforcement placement.
Fold lines.
Glue and construction areas.
Product weight.
Intended filling method.
These details determine where branding can sit safely and how it will look once the bag is assembled.
A flat artwork file can be deceptive. The front panel may appear generous until handles, folds, and the top turnover remove part of the usable area.
Design to the constructed bag, not the rectangle on screen.
Understanding Front-Panel Grids
The front panel is usually the main branding area on a gift bag.
A clear grid helps teams place logos, campaign artwork, product messaging, and finishes in a way that remains balanced after assembly.
The grid should account for:
Top turnover.
Handle holes or fixing points.
Handle drop.
Bottom fold.
Side folds.
Print tolerance.
Safe areas.
Photography angles.
Visual balance when the bag is filled.
A useful front-panel hierarchy may include:
Primary logo.
Campaign or collection message.
Supporting graphic.
Website or social handle.
Regulatory or material information, where suitable.
Not every element needs to appear on the front.
For luxury branded gift bags, restraint often creates more impact than filling every available space.
How To Avoid Handle Clash
Handle clash happens when handles, knots, fixing points, or movement interfere with the artwork.
This may cause:
A logo to become partially covered.
Fine text to sit beneath a knot.
Foil to crack or rub.
A campaign message to become difficult to read.
The bag to look unbalanced when carried.
Handles to cast distracting shadows in photography.
To reduce handle clash:
Mark handle holes and fixing areas on the artwork template.
Show the full handle drop during design review.
Keep key details clear of the upper centre area where handles naturally fall.
Test the bag while carried, not only while standing flat.
Review both loose and filled samples.
Check how knots sit inside and outside the bag.
Consider how ribbon or cord handles move during transport.
Photograph the sample from typical customer angles.
A handle is a moving component. The safe area needs to allow for movement rather than treating it as a fixed line on a dieline.
A Quick Handle-Clash Test
Use this simple test before approving production.
Assemble the gift bag fully.
Fill it with the intended product or an equivalent weight.
Lift the bag by both handles.
Let the handles fall naturally against the front and back panels.
Check whether the logo remains visible.
Review knots, eyelets, and handle shadows.
Carry the bag for a short distance.
Place it down and review how the handles settle.
Photograph the bag from the front, side, and three-quarter angle.
Repeat the test with the maximum expected product weight.
This reveals issues that may not appear in a flat proof.
Handles have a habit of ignoring the artwork meeting.
Using Side Gussets Intelligently
Side gussets are often treated as secondary areas, but they can support a more distinctive design.
They may carry:
A repeating pattern.
Brand colour.
A short message.
A product category.
A web address.
A sustainability instruction.
A seasonal detail.
A subtle secondary logo.
The right use depends on how the bag will appear when:
Folded flat.
Open.
Filled.
Carried.
Photographed.
Stored.
Reused.
A gusset design should remain intentional when folded. Important information should not disappear into the crease or become distorted when the bag expands.
For an immediate visual impact, a contrasting gusset can add interest without overcrowding the front panel.
Front Panel Or Gusset: Where Should Branding Go?
Use the front panel for information that must be recognised quickly.
This usually includes:
The primary logo.
The main campaign message.
A distinctive brand motif.
The product or collection name.
Use the gusset for supporting details.
This may include:
A repeated pattern.
A short line of copy.
A colour contrast.
A web address.
A disposal or reuse instruction.
A secondary symbol.
The gusset should reward a closer look. The front panel should work from across the room.
Choosing The Right Bag Proportions
Bag proportion affects presentation, product protection, carrying comfort, and material use.
A bag that is too large can:
Allow products to move.
Require unnecessary tissue or fill.
Feel wasteful.
Reduce perceived product value.
Take up more storage space.
Increase transport volume.
A bag that is too small can:
Distort the side panels.
Place strain on the handles.
Crush tissue or inserts.
Make products difficult to remove.
Damage the bag during filling.
Create a less polished handover.
When selecting dimensions, consider:
Product size.
Product quantity.
Protective packaging.
Tissue.
Inserts.
Seasonal additions.
Handle comfort.
Retail storage.
Shipping cartons.
Packing speed.
The best gift bag should feel made for the purchase, not borrowed from another product line.
Materials That Support Premium Presentation
The brief does not specify exact board grades or constructions, so material choices should be assessed through supplier samples and performance testing.
Review:
Surface smoothness.
Stiffness.
Crease quality.
Print performance.
Colour consistency.
Resistance to marking.
Handle strength.
Base strength.
Product weight.
Storage conditions.
Reuse potential.
Recycled content.
Certification evidence.
Recyclability.
Coatings and laminations.
A luxury appearance can come from:
A refined uncoated surface.
A controlled matt finish.
Strong colour coverage.
Crisp foil.
Precise typography.
A well-matched handle.
Clean construction.
Considered proportions.
Thickness alone does not create luxury. An oversized bag made from unnecessary material may feel less considered than a lighter, well-engineered one.
Coated, Laminated, Or Uncoated Finishes
Uncoated Bags
Uncoated materials can create a tactile, understated feel.
They may suit brands seeking:
A softer appearance.
Natural texture.
Less surface shine.
A refined editorial look.
Check colour absorption, rub resistance, and how the surface behaves during packing.
Coated Bags
A coated surface may support:
Cleaner colour reproduction.
Greater surface consistency.
A smoother tactile finish.
Improved resistance to light handling marks.
The coating should be reviewed as part of the complete sustainability and disposal specification.
Laminated Bags
Lamination may create:
Gloss.
Matt appearance.
Increased surface protection.
A particular tactile effect.
It can also affect recyclability and material separation. Do not make broad environmental claims without evidence for the complete bag construction.
The finish should serve the design and operating conditions, not simply appear on a standard luxury-packaging checklist.
Choosing Handles That Match The Brand
Handles influence appearance, carrying comfort, packing, storage, and the final unboxing experience.
Options may include:
Cord.
Ribbon.
Paper twist.
Flat paper.
Die-cut handles.
Textile-style handles.
When comparing handles, review:
Colour.
Thickness.
Texture.
Drop length.
Knot size.
Attachment.
Strength.
Comfort.
Movement.
Fraying.
Supplier consistency.
Material evidence.
Disposal route.
Compatibility with the bag’s weight.
A fine handle may suit a small beauty bag. A larger fashion purchase may require more carrying comfort and greater strength.
The handle should look like part of the bag, not an accessory chosen five minutes before production.
Handle Colour And Contrast
Handle colour can:
Match the main print.
Echo a secondary brand colour.
Create a seasonal accent.
Add contrast.
Connect with ribbon, tissue, or product packaging.
Review handle colour against the complete assembled bag.
A colour that looks correct as a loose sample may shift visually when placed beside printed ink, foil, or a coated surface.
Where colour consistency matters, compare physical samples under suitable lighting and record the approved specification.
Interested in Printed ribbon that matches brand palettes?
Read The Blog →
Print And Finishing Options
Eye-catching branded gift bags can use print and finishing techniques to create focus without overcrowding the design.
Options may include:
Hot foil.
Embossing.
Debossing.
Spot UV.
Varnish.
Metallic ink.
Printed interiors.
Edge or gusset colour.
Patterned side panels.
Textured materials.
Hot Foil
Hot foil can create a sharp metallic or pigmented detail.
It may work well for:
Logos.
Borders.
Collection names.
Small focal points.
Keep foil clear of folds, handle fixing points, and areas exposed to frequent rubbing unless testing confirms suitable performance.
Embossing And Debossing
Embossing and debossing add tactile depth.
They can support a quieter luxury feel, but the selected material and bag construction need to suit the process.
Test the finish near:
Folds.
Creases.
Handle areas.
Panel edges.
Smaller text.
Spot UV And Varnish
Spot finishes can create contrast between matt and gloss areas.
Use them to direct attention, not to fill the panel. A carefully placed highlight can feel premium. Too many competing effects can make the design look busy.
Colour Consistency Across Gift Bags
Colour consistency matters when gift bags sit beside:
Product boxes.
Tissue.
Ribbon.
Labels.
Retail displays.
E-commerce photography.
Seasonal campaign materials.
To maintain consistency:
Use agreed colour references.
Review the colour on the chosen material.
Approve physical samples.
Compare suppliers carefully.
Record print specifications.
Check colour under more than one lighting condition.
Consider how coatings and finishes affect appearance.
Keep approved samples for repeat orders.
The same colour can appear different across uncoated paper, coated paper, foil, ribbon, and digital screens.
Consistency means managing those differences, not pretending they do not exist.
Designing For Luxury Cosmetics
Gift bags for luxury cosmetics may need to accommodate:
Small products with significant weight.
Glass bottles.
Fragrance.
Gift sets.
Protective inserts.
Tissue.
Samples.
Printed product information.
Consider:
Base strength.
Handle security.
Bag depth.
Internal movement.
Protection from impact.
Product orientation.
Whether the bag will be used at a counter or shipped inside another pack.
Whether fragrance or cosmetic residue could mark the surface.
A small bag can still carry a relatively heavy product. Test the complete filled bag rather than approving the material from appearance alone.
Designing For Fashion And Apparel
Fashion bags may need:
Wider gussets.
Greater height.
More generous handle drops.
Space for tissue.
Resistance to creasing.
Comfortable carrying.
Efficient flat storage.
Review how the bag performs with:
Folded garments.
Accessories.
Multiple-item purchases.
Seasonal gifting.
Returns or exchanges.
Retail queue volumes.
Larger bags create bigger branding areas, but they also make poor proportions and handle clash more visible.
Designing For Jewellery
Jewellery gift bags are often smaller and may need to carry:
Rigid boxes.
Pouches.
Care cards.
Receipts.
Certificates.
Small gifting messages.
Premium impact may come from:
Precise proportions.
A restrained logo.
A tactile paper.
A fine handle.
A carefully selected foil.
A contrasting interior.
A smaller format gives artwork less room to recover from poor placement. Safe areas and handle positions become especially important.
Branded Gift Bags And Unboxing Experiences
Gift bags may sit outside the traditional e-commerce box, but they still shape unboxing experiences.
The customer may:
Receive the bag.
Notice the colour and logo.
Touch the handles and material.
Open the top.
Move tissue or ribbon.
Reveal the product.
Remove product packaging.
Keep, reuse, or dispose of the bag.
Each stage contributes to the overall impression.
Impactful gift packaging ideas should connect these moments.
For example:
The handle may match the ribbon inside.
The gusset colour may appear again on a product card.
The front logo may echo the box finish.
A message inside the bag may reward opening.
The bag may include simple reuse guidance.
The sequence should feel connected without every component repeating the same design.
Making Gift Bags More Photographable
A photogenic bag should still work as a bag.
Review:
Logo visibility while carried.
Reflections from gloss or foil.
Handle shadows.
Gusset colour at a three-quarter angle.
How the bag sits when filled.
Whether the base remains flat.
How tissue appears at the opening.
Whether the main message is readable on a mobile screen.
Whether the bag looks balanced beside the product.
Use authentic photography showing the assembled bag at realistic scale.
Helpful image types include:
Front view.
Three-quarter view.
Side-gusset view.
Carried view.
Filled interior.
Material close-up.
Handle detail.
Bag beside the product.
Seasonal grouping.
Avoid relying entirely on perfect mock-ups. Customers receive constructed packaging, not a flat render floating in immaculate lighting.
Corporate Goodie Bags And Brand Events
Corporate goodie bags may need to carry several products, printed materials, and promotional items.
Priorities can include:
Fast filling.
Clear event branding.
Reliable handles.
Suitable capacity.
Easy distribution.
Consistent appearance.
Practical storage.
Post-event reuse.
Before production, test:
The full item mix.
Weight distribution.
Handle comfort.
Packing time.
Bag stability.
Whether items distort the side panels.
Whether the logo remains visible when filled.
Whether variations need separate identification.
A premium event bag should feel generous without becoming difficult to carry or unnecessarily oversized.
Balancing Presentation With Operational Efficiency
C-suite executives reviewing packaging strategy need more than a beautiful sample.
The bag must also work across:
Procurement.
Supplier lead times.
Print approval.
Storage.
Shipping.
Retail distribution.
Filling.
Staff training.
Seasonal volume.
Quality control.
Reordering.
End-of-life communication.
Operational questions include:
How are bags delivered and packed?
How much warehouse space do they require?
Are handles supplied attached?
Do the bags arrive folded consistently?
How quickly can teams fill them?
Are several sizes easy to distinguish?
Can seasonal variations share a common specification?
How are damaged bags identified?
Can the supplier scale during peaks?
What is the minimum order quantity?
How are repeat colours and finishes controlled?
A bag that takes too long to open, sticks together, or arrives with tangled handles can slow a busy retail or gifting operation.
Luxury should feel effortless to the customer. It still needs discipline behind the scenes.
Seasonal Packaging Strategy
Seasonal cycles create both creative opportunities and stock risks.
Before producing seasonal customised gift bags:
Confirm campaign dates.
Forecast quantities.
Review regional demand.
Set artwork approval deadlines.
Confirm supplier capacity.
Check handle and material availability.
Plan delivery windows.
Record minimum quantities.
Assess leftover-stock risk.
Decide whether the bag can remain relevant beyond the campaign.
Approve a backup specification.
Coordinate photography and launch assets.
Where possible, consider:
A core branded bag with seasonal tissue.
A reusable campaign tag.
A limited-edition ribbon.
A removable sticker.
A variable insert.
This may allow the main bag to remain useful for longer while still creating a seasonal moment.
Sustainability Commitments And Gift Bags
Sustainability commitments should be built into the specification and supported by evidence.
Ask suppliers for details about:
Paper composition.
Recycled content, including the stated percentage.
FSC-certified options.
Handle material.
Reinforcement board.
Coatings.
Lamination.
Foil.
Adhesives.
Inks.
Recyclability.
Component separation.
Production waste.
Minimum order quantities.
Packaging and transport format.
Supplier certifications.
Use clear, supportable wording such as:
Recyclable.
Made with a stated percentage of recycled content.
FSC-certified options available.
Plastic-free options available.
Responsibly sourced.
Avoid unsupported terms such as:
100% sustainable.
Zero-waste.
Planet-saving.
Completely eco-friendly.
Carbon-neutral, unless formally certified.
A paper bag is not automatically a complete sustainability strategy. Handles, reinforcements, finishes, coatings, quantities, and disposal guidance all matter.
Designing For Reuse
A gift bag is more likely to be reused when it is:
Strong enough.
Easy to store.
Visually appealing.
Not tied too closely to one date or event.
Suitable for another gift.
Comfortable to carry.
Free from unnecessary personal data.
Easy to fold or keep.
Reuse messaging may be placed:
Inside the bag.
On a tag.
Near the base.
On a removable label.
On a QR-linked guidance page.
The message should be realistic.
For example:
Keep this bag for gifting, storage, or its next very good outing.
Only make reuse claims that match the bag’s actual durability and design.
Assessing Cost And Profitability
The brief does not provide verified profitability figures, so business impact should be evaluated through the full packaging process.
Consider:
Unit cost.
Tooling.
Print colours.
Finishes.
Handles.
Reinforcement.
Sampling.
Minimum quantities.
Storage.
Distribution.
Filling time.
Damage rates.
Leftover seasonal stock.
Supplier changes.
Customer feedback.
Reuse potential.
Thoughtful packaging design may support profitability by:
Reducing unnecessary material.
Limiting rework.
Improving packing efficiency.
Reducing damaged bags.
Standardising sizes.
Extending a design across several channels.
Managing seasonal stock more carefully.
Strengthening perceived presentation quality.
These effects should be measured rather than assumed.
The most expensive bag is not automatically the most effective. The least expensive bag can become costly when it fails in use.
Measuring Gift Bag Performance
Useful measures may include:
Damage rate.
Handle failures.
Filling time.
Storage volume.
Packing waste.
Reorder consistency.
Seasonal surplus.
Customer feedback.
Retail team feedback.
Reuse-related engagement.
Social content featuring the bag.
Cost per completed pack.
Complaints about size or handling.
Where possible, compare the existing and proposed bag under similar conditions.
A design review should include creative, procurement, retail, fulfilment, and sustainability teams. Each sees a different part of the bag’s performance.
Evaluating Packaging Suppliers
A suitable supplier should understand the relationship between design ambition and production reality.
Ask:
Which materials suit the required appearance and product weight?
How will handles affect the safe print area?
Can you supply an accurate dieline?
What print tolerances apply?
Can we review an assembled sample?
How are colours approved?
Which finishes perform well near folds?
What are the minimum order quantities?
Can you support peak-season demand?
How are repeat orders controlled?
What sustainability evidence is available?
Can components be substituted?
How will changes be communicated?
How are bags packed for delivery?
What quality checks cover handles, construction, and print?
A strong supplier should identify potential problems before production.
“We can print your logo there” is not the same as “your logo will still read clearly when the bag is carried”.
A Branded Gift Bag Development Process
Use this step-by-step approach.
Define the bag’s role. Retail, gifting, events, e-commerce, or several channels.
Confirm the product mix. Size, quantity, weight, and protective packaging.
Select initial dimensions. Include tissue, inserts, and handling space.
Map the construction. Mark gussets, folds, turnover, base, glue areas, and handle positions.
Create panel grids. Separate primary and supporting branding areas.
Place the handles. Show their full drop and movement.
Develop the artwork. Protect the main focal point from folds and handle clash.
Select materials and finishes. Review appearance, performance, and evidence.
Build an assembled sample. Do not approve the bag from a flat proof alone.
Fill and carry the sample. Use the intended products and realistic weight.
Photograph the bag. Review front, side, carried, and opened views.
Test operational handling. Include storage, opening, filling, and distribution.
Confirm sustainability claims. Match every statement to supporting evidence.
Record the specification. Save the material, print, handle, dimensions, and approved sample.
Run production checks. Compare delivered bags with the agreed standard.
This process helps create custom bags for business that look right and work properly.
Impactful Branded Gift Bag Checklist
Before approving production, confirm that:
The bag dimensions suit the product.
Product weight has been tested.
The front-panel grid is clearly defined.
Gusset artwork remains readable.
Fold and construction areas are marked.
The logo avoids handle clash.
Handle movement has been tested.
Knots and fixing points do not cover artwork.
The bag looks balanced when filled.
The base remains stable.
Print and finishes suit the selected material.
Colour has been approved physically.
The handle colour matches the wider packaging system.
The bag is efficient to store and fill.
Seasonal quantities and lead times are confirmed.
Sustainability claims are supported.
Reuse guidance is realistic.
The completed bag has been photographed.
Retail or packing teams have reviewed the sample.
The approved specification is saved for repeat production.
Make The First Impression Carry Further
The best branded gift bags make an impact before the product is opened and continue working long after the handover.
Clear panel grids, carefully planned gussets, well-positioned handles, suitable materials, and evidence-led sustainability choices can turn a simple carrier into a strong brand moment.
When every detail is tested on the assembled and filled bag, luxury brands can create packaging that looks unmistakable, performs efficiently, and feels worth keeping.
Explore Branded Gift Bags And Packaging Options →
FAQs
How Do Branded Gift Bags Enhance The Unboxing Experience?
Branded gift bags create a visual and tactile introduction before the product is revealed. Colour, material, handles, print, and structure can make the handover feel more considered and connect the bag with the packaging inside.
What Are The Key Elements Of Intelligent Gift Bag Design?
Key elements include suitable dimensions, front-panel and gusset grids, clear safe areas, well-positioned handles, appropriate materials, and a structure tested with the intended product. The design should work when flat, filled, carried, opened, and photographed.
How Can Luxury Brands Avoid Handle Clash?
Show the handle holes, knots, fixing areas, full drop, and natural movement on the artwork template. Keep essential branding clear of those areas, then test an assembled and filled sample while it is being carried.
What Packaging Challenges Do C-Suite Executives Face?
Typical challenges include balancing premium presentation with cost, supplier capacity, seasonal timing, sustainability evidence, consistency across markets, storage, and retail efficiency. The final specification must work across the complete supply chain.
How Does Packaging Design Affect Brand Desirability?
Packaging design influences the first physical impression of the purchase. A well-proportioned, clearly branded, and carefully finished gift bag can reinforce quality, while awkward handles, weak construction, or crowded artwork may reduce the intended effect.
What Sustainable Practices Can Be Used In Gift Bag Production?
Brands can assess recycled content, FSC-certified options, handle materials, coatings, finishes, order quantities, recyclability, and reuse potential. All claims should be specific and supported by supplier documentation.
How Can Thoughtful Gift Bag Design Support Profitability?
A suitable design may reduce damage, simplify filling, standardise formats, manage seasonal stock, and strengthen presentation. These benefits should be measured through operational and commercial data rather than assumed.
What Materials Are Best For High-Impact Gift Bags?
The best material depends on product weight, dimensions, print, finish, storage, handling, and sustainability requirements. Physical samples and filled-bag testing are more reliable than choosing by board description alone.
How Do Gusset And Front-Panel Grids Support Branding?
The front-panel grid protects the main focal point, while the gusset grid controls supporting artwork around folds and expansion areas. Together, they help branding remain balanced after the bag is assembled and filled.
What Are Examples Of Successful Luxury Gift Bag Campaigns?
The supplied brief does not include verified campaign case studies. Brands reviewing examples should look for evidence of clear brand recognition, functional handle placement, consistent production, customer response, and measurable operational performance.
/* Blog only: prevents link/button/table/FAQ styles leaking across the website */
.branded-gift-bags-blog a:not(.pill-outline){
color: #30acd9 !important;
font-weight: 700 !important;
text-decoration: underline !important;
text-underline-offset: 3px;
}
/* Pill outline button */
.branded-gift-bags-blog .pill-outline,
.branded-gift-bags-blog a.pill-outline{
display: inline-flex;
align-items: center;
justify-content: center;
gap: 10px;
padding: 12px 26px;
border: 2px solid #111;
border-radius: 9999px;
background: transparent;
color: #111 !important;
text-decoration: none !important;
font-family: inherit;
font-weight: 700;
font-size: 12px;
line-height: 1;
text-transform: uppercase;
letter-spacing: 0.08em;
cursor: pointer;
user-select: none;
transition: background-color 160ms ease, color 160ms ease, transform 120ms ease;
}
.branded-gift-bags-blog .pill-outline__text{
color: inherit;
font-weight: 700;
text-decoration: none !important;
}
.branded-gift-bags-blog .pill-outline__arrow{
color: inherit;
text-decoration: none !important;
font-size: 14px;
line-height: 1;
transform: translateY(-0.5px);
}
.branded-gift-bags-blog .pill-outline:hover{
background: #111;
color: #fff !important;
text-decoration: none !important;
}
.branded-gift-bags-blog .pill-outline:hover .pill-outline__text,
.branded-gift-bags-blog .pill-outline:hover .pill-outline__arrow{
color: #fff !important;
text-decoration: none !important;
}
.branded-gift-bags-blog .pill-outline:active{
transform: translateY(1px);
}
.branded-gift-bags-blog .pill-outline:focus-visible{
outline: 2px solid #e9b448;
outline-offset: 3px;
}
/* Tables */
.branded-gift-bags-blog .table-wrap{
width: 100%;
overflow-x: auto;
border: 1px solid rgb(234, 232, 230);
border-radius: 18px;
background: #fff;
margin: 14px 0 26px 0;
}
.branded-gift-bags-blog .tb-table{
width: 100%;
border-collapse: collapse;
min-width: 780px;
font-family: Arial, sans-serif;
}
.branded-gift-bags-blog .tb-table thead th{
text-align: left;
font-weight: 700;
font-size: 14px;
padding: 14px 14px;
border-bottom: 1px solid rgb(234, 232, 230);
background: #fafafa;
white-space: nowrap;
}
.branded-gift-bags-blog .tb-table td{
font-size: 14px;
line-height: 1.5;
padding: 14px 14px;
border-bottom: 1px solid rgb(234, 232, 230);
vertical-align: top;
}
.branded-gift-bags-blog .tb-table tbody tr:last-child td{
border-bottom: none;
}
/* FAQ */
.branded-gift-bags-blog .faq{
width: 90%;
max-width: 900px;
margin: 0 auto 32px auto;
font-family: Arial, sans-serif;
}
.branded-gift-bags-blog .faq-title{
text-align: center;
margin: 0 0 14px 0;
font-size: 24px;
line-height: 1.3;
}
.branded-gift-bags-blog .faq-item{
border: 1px solid rgb(234, 232, 230);
border-radius: 25px;
background: #fff;
overflow: hidden;
margin: 10px 0;
}
.branded-gift-bags-blog .faq-item summary{
position: relative;
list-style: none;
cursor: pointer;
padding: 16px 56px 16px 18px;
font-weight: 700;
font-size: 16px;
line-height: 1.4;
outline: none;
user-select: none;
}
.branded-gift-bags-blog .faq-item summary::-webkit-details-marker{ display: none; }
.branded-gift-bags-blog .faq-item summary::after{
content: "\25B8";
position: absolute;
right: 18px;
top: 50%;
transform: translateY(-50%);
transition: transform 160ms ease;
font-size: 18px;
line-height: 1;
opacity: 0.8;
}
.branded-gift-bags-blog .faq-item[open] summary::after{
transform: translateY(-50%) rotate(90deg);
}
.branded-gift-bags-blog .faq-content{
padding: 12px 18px 18px 18px;
margin-top: 6px;
font-size: 15px;
line-height: 1.6;
color: #333;
border-top: 1px solid rgb(234, 232, 230);
background-color: #fff;
}
.branded-gift-bags-blog .faq-item summary:hover{ background: #fafafa; }
.branded-gift-bags-blog .faq-item summary:focus-visible{
outline: 2px solid #e9b448;
outline-offset: 2px;
border-radius: 18px;
}
@media (max-width: 600px){
.branded-gift-bags-blog .faq-title{ font-size: 22px; }
.branded-gift-bags-blog .faq-item summary{ font-size: 15px; padding: 14px 48px 14px 16px; }
.branded-gift-bags-blog .faq-content{ font-size: 14px; padding: 14px 16px 16px 16px; margin-top: 4px; }
.branded-gift-bags-blog .tb-table{ min-width: 720px; }
}
Empowering Sustainable Practices: Recycling and Reuse in Accessories
Empowering Sustainable Practices Through Recycling And Reuse
Sustainable packaging only works when people know what to do with it.
A recyclable box may still enter general waste. A reusable bag may be used once. A paper tag may carry a green symbol but no useful instruction. Good materials matter, but clear copy turns intention into action.
For sustainable retail businesses, stickers, labels, tags, inserts, and other packaging accessories offer valuable space to explain what can be recycled, what needs to be separated, and how an item could be reused.
The best text that supports recycling and reuse is specific, easy to find, and simple to follow. It does not make the customer decode vague icons, hunt through a website, or guess which part of the pack a statement refers to.
Sustainability needs substance. It also needs decent directions.
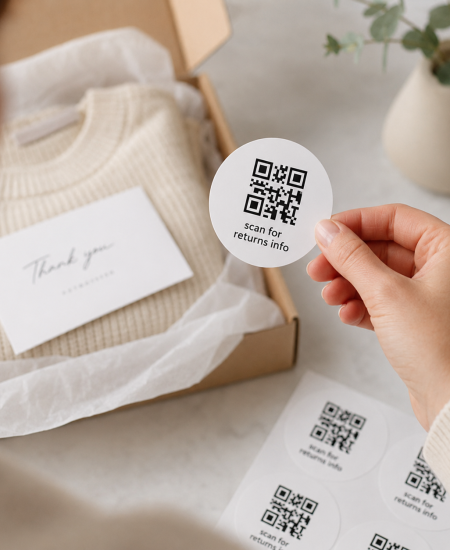
What Is Recycling And Reuse Copy?
Recycling and reuse copy is clear packaging text that tells customers how to dispose of, separate, return, refill, or repurpose packaging and its components.
It may appear on:
Stickers.
Product labels.
Swing tags.
Gift tags.
Packaging inserts.
Box interiors.
Tissue seals.
Care cards.
Return instructions.
QR code landing pages.
Useful content that aids in recycling and repurposing should identify the relevant item, explain the action, and avoid unsupported environmental claims.
For example, “Recycle this box” is clearer than “Better for the planet”, provided the box is genuinely recyclable within the intended system and any relevant conditions are explained.
Start With Reduce, Reuse, And Recycle
The three Rs provide a useful hierarchy for sustainable retail decisions.
Reduce
Reduce unnecessary materials, components, finishes, and printed information.
Ask:
Is every packaging layer needed?
Could one label perform two functions?
Is the accessory larger than necessary?
Can printed information be shortened?
Could several packaging variations use one standard component?
Will a seasonal message create obsolete stock?
Is a separate insert required, or could the information appear inside the box?
Reduction should not compromise product protection, compliance, or the customer experience. The aim is to remove what adds little value, not what keeps the product secure.
Reuse
Design packaging and accessories so customers have a realistic reason to use them again.
Reuse ideas may include:
Keeping a box for storage.
Reusing a gift bag.
Turning a ribbon into a future gift wrap.
Using a tag as a bookmark.
Reusing a pouch for travel or organisation.
Returning a refillable container.
Using suitable tissue or paper for craft projects.
Reusing a delivery pack for a return where it has been designed for that purpose.
The idea should suit the product and material. Asking customers to save every scrap of packaging is not reuse guidance. It is clutter with good intentions.
Recycle
Explain how each component should enter the appropriate waste or recycling route.
Clear recycling copy may need to identify:
The box.
An insert.
A paper label.
A plastic window.
A ribbon.
A closure.
A bottle.
A cap.
A pump.
A protective sleeve.
Where components need to be separated, say so. Where local acceptance varies, avoid giving a universal instruction that may be misleading.
Why Clear Packaging Copy Matters
Customers often make disposal decisions quickly.
If the wording is unclear, hidden, or overly technical, the packaging may enter the wrong waste stream. Clear instructions can make the next step easier and reinforce a brand’s commitment to transparent sustainable retail.
Effective messaging can help businesses:
Give customers a practical action.
Reduce confusion between components.
Explain when separation is required.
Support packaging reuse.
Avoid vague sustainability language.
Build trust through transparency.
Connect physical packaging with further guidance.
Keep customer-facing copy consistent.
Support wider sustainability initiatives.
Good copy does not guarantee that every customer will follow the instruction, but unclear copy makes the desired action much less likely.
The Principles Of Effective Recycling Copy
Strong recycling tips for retailers should follow five principles.
Be Specific
Name the component.
Better:
Recycle the cardboard box.
Remove the ribbon before recycling the box.
Reuse this bag for gifting or storage.
Check local guidance for this plastic component.
Less useful:
Please recycle.
Dispose responsibly.
Be green.
Love the planet.
A customer should not need to decide which part of the packaging the message refers to.
Be Brief
Packaging space is limited, and disposal guidance needs to work at a glance.
Use short sentences and familiar words. Additional details can sit behind a meaningful QR code or web link where necessary.
Put The Action First
Lead with the step the customer should take.
For example:
Remove the label, then recycle the box.
Keep and reuse this bag.
Separate the cap from the bottle.
Return this pack using the enclosed label.
The customer needs an action, not a sustainability speech.
Keep Instructions Visible
Place guidance where it will be seen during opening, separation, or disposal.
Potential locations include:
Inside a lid.
On the reverse of a tag.
Beside an opening point.
On a removable sticker.
Near the material it describes.
On an enclosed care or return card.
Do not hide essential guidance beneath a closure that may be discarded before it is read.
Support Every Claim
Claims should be based on material specifications, recognised standards, percentages, or certifications.
Use language such as:
Recyclable.
Made with a stated percentage of recycled content.
FSC-certified options available.
Plastic-free options available.
Responsibly sourced.
Avoid unsupported claims such as:
100% sustainable.
Zero-waste.
Planet-saving.
Completely eco-friendly.
Carbon-neutral, unless formally certified.
Stylish copy is welcome. Fiction is not.
Understanding OPRL Guidance
OPRL stands for On-Pack Recycling Label. It is used to help communicate recycling information to UK consumers through consistent on-pack labelling.
For retail businesses, OPRL guidance may help shape:
Which recycling message is used.
How components are identified.
Whether separation instructions are required.
Where the label appears.
How clearly the instruction can be read.
Whether additional consumer guidance is needed.
The exact label and wording should reflect the current applicable guidance, packaging specification, and evidence available for the material.
Before printing, confirm:
The material composition.
Whether the packaging contains several components.
Whether those components must be separated.
The relevant recycling route.
The correct current label.
The available print area.
The legibility of the final artwork.
Who has approved the instruction.
Do not choose a recycling label based on appearance alone. The prettiest icon in the artwork folder is not necessarily the right one.
How To Incorporate OPRL Messaging Into Accessories
Stickers, labels, and tags can provide space for recycling guidance without crowding the main packaging design.
Stickers
A sticker can carry:
Recycling instructions.
Component separation guidance.
A reuse prompt.
A return message.
A QR code linking to detailed information.
Before using a sticker for disposal guidance, consider whether it affects the recycling route of the surface beneath it.
The adhesive, face material, coating, and liner should all be reviewed as part of the complete specification.
Product Labels
Product labels can keep disposal information close to the item it describes.
They may be useful where:
The outer packaging is removed quickly.
The product contains several materials.
The customer needs guidance after extended use.
A refill, return, or take-back process applies.
Make sure the label remains readable for the expected life of the product.
Swing Tags And Gift Tags
Tags are useful when the primary packaging needs to remain visually minimal.
The reverse of a tag can contain:
Material details.
Recycling instructions.
Reuse ideas.
Care guidance.
A link to further information.
Explore gift tags for an accessory that can carry practical information while supporting the wider packaging design.
Inserts
An insert can provide more detailed guidance, particularly where several materials or steps are involved.
Keep the information structured. Headings, short bullets, and simple instructions are more useful than one dense paragraph about the brand’s values.
A Simple Recycling Message Formula
Use this three-part formula when writing packaging guidance:
Name the item.
State the action.
Add a condition only where necessary.
Examples:
Cardboard box: flatten and recycle.
Paper insert: recycle with paper and card.
Gift bag: keep and reuse.
Ribbon: remove before recycling the box.
Bottle and cap: separate if required by the applicable guidance.
Return pack: reseal using the second adhesive strip.
The wording must be checked against the actual material and the current relevant guidance before use.
Recycling Copy Examples For Retail Packaging
The following examples show the style and structure of useful messaging. They are not material-specific approvals.
For A Recyclable Box: Recycle this box. Flatten it first to save space.
For Packaging With A Removable Accessory: Remove the ribbon, then recycle the box.
For A Reusable Gift Bag: Keep this bag for gifting, storage, or another very good outfit.
For A Reusable Box: Made to be kept. Reuse this box for jewellery, keepsakes, or organised odds and ends.
For Packaging With Several Components: Separate each component before disposal. Check the guidance shown for every material.
For A QR Code: Scan for recycling and reuse guidance.
For A Return-Ready Pack: Opening carefully? Keep this pack for your return.
The final instruction should be based on the exact pack, material, and operating model.
How To Promote Reuse In Retail
Reuse works best when the second use is obvious, useful, and realistic.
A reuse prompt should answer one simple question:
What can the customer genuinely do with this next?
Strong reuse ideas are:
Relevant to the packaging format.
Easy to understand.
Safe.
Achievable without specialist tools.
Worth the customer’s effort.
Consistent with the brand.
Supported by the material’s durability.
For example, a rigid gift box may work well for storage. A gift bag may be reused for another present. A strong ribbon may be kept for future wrapping. A decorative tag may become a bookmark.
A lightweight transit insert with product residue is less likely to have a credible second use.
Reuse copy should inspire rather than instruct customers to keep packaging they do not need.
Reuse Ideas For Different Accessories
Gift Tags
A gift tag may be designed for:
Reuse on another gift.
A bookmark.
A keepsake card.
A note or place card.
A reusable design may leave space for another message or avoid printing a fixed recipient name.
Ribbon
Ribbon may be reused for:
Future gift wrapping.
Craft projects.
Hair or accessory storage, where suitable.
Tying stationery or keepsakes.
Do not describe a ribbon as recyclable, compostable, biodegradable, or plastic-free without evidence for the exact material.
Stickers
Stickers are usually difficult to reuse once applied, so focus on:
Reducing unnecessary sticker size.
Selecting a suitable material.
Avoiding multiple overlapping labels.
Explaining whether removal is required.
Reviewing the release liner and adhesive.
Using one label for more than one communication purpose where practical.
See Stickers that hold on kraft and laminate for guidance on matching adhesives to packaging surfaces.
Read The Blog →
Boxes
Boxes may be reused for:
Product storage.
Gifting.
Returns, where designed for it.
Jewellery or accessory organisation.
Documents or photographs.
Craft materials.
A reuse message works best when the box has enough durability and an opening method that does not destroy it.
Bottles And Containers
Bottle recycling or reuse guidance should reflect the exact packaging format and applicable scheme.
Depending on the product, businesses may need to explain:
Whether the bottle should be emptied.
Whether the cap, pump, or label should be separated.
Whether the container can be refilled.
Whether a return scheme applies.
Whether local recycling acceptance varies.
Do not assume that every plastic bottle or component follows the same route.
Designing Packaging For Reuse
Copy cannot rescue packaging that was never designed to survive a second use.
If reuse is a genuine goal, consider it during design.
Review:
Material strength.
Opening method.
Closure.
Surface durability.
Shape.
Storage usefulness.
Removal of shipping information.
Product residue.
Ease of cleaning, where relevant.
Space for a second label.
Return functionality.
How accessories affect reuse.
A box described as reusable should remain presentable after the first opening. A bag should have handles that can withstand another journey. A refillable container should be supported by an actual refill process.
The message and the product need to agree.
Avoiding Sustainability Message Overload
Retail packaging may already contain:
Product information.
Legal copy.
Care guidance.
Promotional messaging.
Social links.
Brand storytelling.
Returns information.
Recycling instructions.
Trying to fit every sustainability initiative onto one small tag can make the guidance harder to use.
Prioritise:
The immediate customer action.
Any required separation step.
The correct disposal or reuse route.
A link to further information where necessary.
Detailed sourcing policies, broader sustainability targets, and supplier stories may be better placed on a dedicated web page.
The packaging should tell customers what to do now. The website can explain the bigger picture.
Using QR Codes For More Detailed Guidance
A QR code can connect limited packaging space with more detailed information.
It may link to:
Material breakdowns.
Recycling instructions.
Reuse ideas.
Return schemes.
Refill programmes.
Packaging certifications.
Supplier documentation.
Frequently asked questions.
The printed copy should explain where the code leads.
Better:
Scan for recycling and reuse guidance.
Less useful:
Scan me.
Before launch:
Test the code at the printed size.
Check it on the selected material.
Confirm the destination page works on mobile.
Use a stable URL.
Review accessibility.
Keep essential actions available without requiring a scan.
Assign responsibility for updating the page.
A QR code should open useful information, not a homepage and a treasure hunt.
Sustainability Claims And Proof
Customers and procurement teams increasingly expect evidence behind environmental claims.
Ask suppliers for:
Material specifications.
Recycled content percentages.
FSC certification details where relevant.
Responsible sourcing information.
Recyclability guidance.
Coating information.
Adhesive specifications.
Plastic-free evidence.
Production location where required.
Supporting certificates.
Disposal instructions.
Validity dates for documentation.
Record which claim applies to which packaging component.
For example, an FSC-certified paper tag does not automatically make the complete pack FSC-certified. A recyclable box does not mean every attached ribbon, sticker, or closure belongs in the same recycling stream.
Be precise about what the evidence supports.
Supplier Transparency Matters
A supplier supporting sustainable packaging solutions should be able to explain:
What the material is.
What percentage is recycled.
Which certification applies.
Whether a coating or finish changes disposal guidance.
How an accessory affects the main pack.
What documentation is available.
Whether the material can be sourced consistently.
What lead times and minimum quantities apply.
How specifications are controlled.
How changes are communicated.
Ask whether equivalent materials may be substituted during production. A change in paper, adhesive, coating, or string may alter the claim or disposal message.
Supplier transparency helps prevent approved copy from becoming inaccurate before it reaches the customer.
Measuring Recycling And Reuse Initiatives
Businesses should decide what success looks like before changing packaging copy.
Possible measures include:
Percentage of packaging carrying clear disposal guidance.
Percentage of material claims supported by documentation.
Number of customer questions about disposal.
QR code engagement.
Participation in return or refill schemes.
Packaging component count.
Reduction in unnecessary accessory use.
Reusable packaging uptake where measurable.
Packaging complaints.
Supplier documentation completion.
Obsolete packaging stock.
Staff understanding of approved claims.
These measures do not prove broader outcomes such as reduced carbon emissions or effects on global warming without suitable evidence and methodology.
Avoid turning small operational changes into oversized environmental claims.
Measure what the business can genuinely track, then communicate it accurately.
Common Challenges And Practical Responses
Customers Do Not Notice The Guidance
Try:
Moving it closer to the opening point.
Increasing contrast.
Shortening the wording.
Naming the component more clearly.
Adding a simple heading.
Repeating essential guidance on an insert or product page.
The Packaging Contains Several Materials
Try:
Listing each component separately.
Using a clear sequence.
Explaining what needs to be removed.
Avoiding one recycling statement for the entire pack.
Linking to more detailed guidance where space is limited.
The Copy Sounds Too Technical
Try:
Replacing industry terms with everyday language.
Leading with the action.
Using one instruction per sentence.
Removing unnecessary background information.
Testing the copy with people outside the packaging team.
Sustainability Claims Are Difficult To Verify
Try:
Requesting supplier documentation.
Naming the exact material.
Stating percentages.
Recording certification references.
Removing claims that cannot be supported.
Reviewing copy when the specification changes.
Reuse Ideas Feel Forced
Try:
Testing whether the second use is genuinely useful.
Asking customers what they already reuse.
Focusing on durable components.
Avoiding instructions that require storage, cleaning, or specialist tools.
Using “reuse if useful” rather than creating guilt.
Sustainable Options Appear More Expensive
Review the complete specification, including:
Material cost.
Component count.
Print quantities.
Obsolete stock.
Packing time.
Storage.
Supplier minimums.
Customer experience.
Reuse or return functionality.
Documentation and compliance work.
The lowest unit price is not always the most efficient packaging decision. Equally, a higher price is not proof of better environmental performance.
A Recycling And Reuse Copy Process
Use this step-by-step approach.
List every packaging component.
Record the material and finish.
Confirm the applicable recycling or reuse route.
Collect supporting documentation.
Identify the customer action.
Write one clear instruction per component.
Check the current applicable OPRL guidance.
Place the message where it will be seen.
Test the copy at actual size.
Review accessibility and contrast.
Confirm claims with the relevant teams.
Approve the final packaging specification.
Retain evidence for every claim.
Review the wording whenever a material changes.
This creates a repeatable system and helps stop sustainability copy becoming an improvised final addition.
Sustainable Retail Packaging Checklist
Before approving packaging and accessory copy, confirm that:
Every component has been identified.
Material information is recorded.
Recycling instructions match the actual specification.
Current applicable OPRL guidance has been checked.
Separation steps are clear.
Reuse ideas are realistic.
Essential wording is visible.
Instructions use plain English.
The action appears early.
Claims are specific.
Recycled content percentages are stated where used.
Certification evidence is available.
Unsupported environmental phrases have been removed.
QR codes explain where they lead.
Digital guidance works on mobile.
The copy remains readable at actual size.
Colour is not the only way information is communicated.
Supplier substitutions are controlled.
The approved wording is linked to the correct material.
A review process is in place.
Give Every Pack A Clear Next Step
Sustainable packaging is not finished when the order leaves the packing bench.
Customers still need to know what to keep, what to separate, what to return, and what to recycle. Clear labels, tags, stickers, and inserts can turn those decisions into simple actions.
By reducing unnecessary components, designing for realistic reuse, following current guidance, and supporting every claim with evidence, retailers can create packaging that looks considered and communicates responsibly.
Explore Gift Tags And Packaging Accessories →
FAQs
What Are The Three Rs Of Sustainability?
The three Rs are reduce, reuse, and recycle. Businesses should first reduce unnecessary material, then consider realistic reuse, and provide clear recycling instructions for what remains.
What Are Examples Of Reduce, Reuse, And Recycle?
Reducing may mean removing an unnecessary insert. Reusing may involve keeping a gift box for storage or using a delivery pack for a return. Recycling may involve flattening a suitable cardboard box and placing it in the correct recycling stream.
How Can Businesses Incorporate OPRL Guidance Into Packaging?
Identify every component, confirm its material and disposal route, then select and position the appropriate current guidance. Instructions should remain legible and should be reviewed whenever the packaging specification changes.
What Reuse Ideas Can Retail Businesses Introduce?
Retailers can design boxes for storage, bags for future gifting, suitable delivery packs for returns, or tags as bookmarks and keepsakes. The second use should be practical, safe, and appropriate for the material.
What Are The Benefits Of Sustainable Packaging In Retail?
Well-specified sustainable packaging can support brand values, provide clearer customer guidance, and help businesses manage materials more deliberately. Any environmental benefit or performance claim should be supported by relevant evidence.
How Can Recycling And Reuse Messaging Improve Customer Relationships?
Clear instructions reduce confusion and show that the business has considered what happens after opening. Specific, honest guidance is more likely to build trust than broad environmental promises.
What Challenges Do Businesses Face When Adopting Recycling And Reuse Practices?
Common challenges include complex material combinations, changing guidance, supplier documentation, costs, limited print space, and unsupported claims. A component-by-component review helps make these issues easier to manage.
How Can Retailers Measure Recycling And Reuse Efforts?
Businesses can track packaging carrying approved instructions, supported material claims, QR code engagement, refill or return participation, customer questions, and reductions in unnecessary packaging components.
What Role Do Stickers, Labels, And Tags Play?
Accessories provide space for material information, separation instructions, reuse prompts, and links to further guidance. They must also be assessed as physical components because their materials and adhesives may affect the complete packaging system.
What Steps Can Retailers Take To Improve Recycling Practices?
Start by identifying every packaging component, collecting material evidence, checking current guidance, simplifying customer instructions, and placing those instructions where they will be seen. Review the copy whenever a material or supplier changes.
/* Blog only: prevents link/button/table/FAQ styles leaking across the website */
.recycling-reuse-packaging-copy-blog a:not(.pill-outline){
color: #30acd9 !important;
font-weight: 700 !important;
text-decoration: underline !important;
text-underline-offset: 3px;
}
/* Pill outline button */
.recycling-reuse-packaging-copy-blog .pill-outline,
.recycling-reuse-packaging-copy-blog a.pill-outline{
display: inline-flex;
align-items: center;
justify-content: center;
gap: 10px;
padding: 12px 26px;
border: 2px solid #111;
border-radius: 9999px;
background: transparent;
color: #111 !important;
text-decoration: none !important;
font-family: inherit;
font-weight: 700;
font-size: 12px;
line-height: 1;
text-transform: uppercase;
letter-spacing: 0.08em;
cursor: pointer;
user-select: none;
transition: background-color 160ms ease, color 160ms ease, transform 120ms ease;
}
.recycling-reuse-packaging-copy-blog .pill-outline__text{
color: inherit;
font-weight: 700;
text-decoration: none !important;
}
.recycling-reuse-packaging-copy-blog .pill-outline__arrow{
color: inherit;
text-decoration: none !important;
font-size: 14px;
line-height: 1;
transform: translateY(-0.5px);
}
.recycling-reuse-packaging-copy-blog .pill-outline:hover{
background: #111;
color: #fff !important;
text-decoration: none !important;
}
.recycling-reuse-packaging-copy-blog .pill-outline:hover .pill-outline__text,
.recycling-reuse-packaging-copy-blog .pill-outline:hover .pill-outline__arrow{
color: #fff !important;
text-decoration: none !important;
}
.recycling-reuse-packaging-copy-blog .pill-outline:active{
transform: translateY(1px);
}
.recycling-reuse-packaging-copy-blog .pill-outline:focus-visible{
outline: 2px solid #e9b448;
outline-offset: 3px;
}
/* Tables */
.recycling-reuse-packaging-copy-blog .table-wrap{
width: 100%;
overflow-x: auto;
border: 1px solid rgb(234, 232, 230);
border-radius: 18px;
background: #fff;
margin: 14px 0 26px 0;
}
.recycling-reuse-packaging-copy-blog .tb-table{
width: 100%;
border-collapse: collapse;
min-width: 780px;
font-family: Arial, sans-serif;
}
.recycling-reuse-packaging-copy-blog .tb-table thead th{
text-align: left;
font-weight: 700;
font-size: 14px;
padding: 14px 14px;
border-bottom: 1px solid rgb(234, 232, 230);
background: #fafafa;
white-space: nowrap;
}
.recycling-reuse-packaging-copy-blog .tb-table td{
font-size: 14px;
line-height: 1.5;
padding: 14px 14px;
border-bottom: 1px solid rgb(234, 232, 230);
vertical-align: top;
}
.recycling-reuse-packaging-copy-blog .tb-table tbody tr:last-child td{
border-bottom: none;
}
/* FAQ */
.recycling-reuse-packaging-copy-blog .faq{
width: 90%;
max-width: 900px;
margin: 0 auto 32px auto;
font-family: Arial, sans-serif;
}
.recycling-reuse-packaging-copy-blog .faq-title{
text-align: center;
margin: 0 0 14px 0;
font-size: 24px;
line-height: 1.3;
}
.recycling-reuse-packaging-copy-blog .faq-item{
border: 1px solid rgb(234, 232, 230);
border-radius: 25px;
background: #fff;
overflow: hidden;
margin: 10px 0;
}
.recycling-reuse-packaging-copy-blog .faq-item summary{
position: relative;
list-style: none;
cursor: pointer;
padding: 16px 56px 16px 18px;
font-weight: 700;
font-size: 16px;
line-height: 1.4;
outline: none;
user-select: none;
}
.recycling-reuse-packaging-copy-blog .faq-item summary::-webkit-details-marker{ display: none; }
.recycling-reuse-packaging-copy-blog .faq-item summary::after{
content: "\25B8";
position: absolute;
right: 18px;
top: 50%;
transform: translateY(-50%);
transition: transform 160ms ease;
font-size: 18px;
line-height: 1;
opacity: 0.8;
}
.recycling-reuse-packaging-copy-blog .faq-item[open] summary::after{
transform: translateY(-50%) rotate(90deg);
}
.recycling-reuse-packaging-copy-blog .faq-content{
padding: 12px 18px 18px 18px;
margin-top: 6px;
font-size: 15px;
line-height: 1.6;
color: #333;
border-top: 1px solid rgb(234, 232, 230);
background-color: #fff;
}
.recycling-reuse-packaging-copy-blog .faq-item summary:hover{ background: #fafafa; }
.recycling-reuse-packaging-copy-blog .faq-item summary:focus-visible{
outline: 2px solid #e9b448;
outline-offset: 2px;
border-radius: 18px;
}
@media (max-width: 600px){
.recycling-reuse-packaging-copy-blog .faq-title{ font-size: 22px; }
.recycling-reuse-packaging-copy-blog .faq-item summary{ font-size: 15px; padding: 14px 48px 14px 16px; }
.recycling-reuse-packaging-copy-blog .faq-content{ font-size: 14px; padding: 14px 16px 16px 16px; margin-top: 4px; }
.recycling-reuse-packaging-copy-blog .tb-table{ min-width: 720px; }
}
Enhancing Picking and Returns with Variable Data Solutions
Enhancing Picking And Returns With Variable Data Solutions
In a high-volume warehouse, a label has very little time to make itself useful.
A picker needs to identify the right SKU. A scanner needs to read the barcode. A packer needs to confirm the order. A customer may need clear returns information. The returns team then needs to recognise the product and move it back through the system.
When variable data is badly organised, every one of those actions can take longer.
Variable data solutions for e-commerce picking help place the right changing information on the right pack, label, or insert. This may include SKUs, barcodes, order references, product variants, return identifiers, routing details, or customer-specific information.
The principle is simple: make essential data easy to find, easy to scan, and easy to act on. Because a premium pack can still look polished without making the barcode play hide-and-seek.
Need Packaging Accessories to get you started?
Explore The Range →
What Is Variable Data In E-Commerce Packaging?
Variable data is information that changes from one printed label, pack, or order to another, while the core packaging design remains consistent.
In e-commerce packaging, variable data may include:
SKU references.
Product names.
Sizes or colours.
Barcodes.
Order numbers.
Batch or lot references.
Picking locations.
Return identifiers.
Routing information.
Customer-specific messages.
QR codes.
Market or language variations.
A variable data system connects approved data with a repeatable print layout. This allows teams to produce packaging or labels containing order-specific information without manually redesigning every version.
The result should be controlled variation, not visual chaos.
How Variable Data Supports Picking And Returns
Data that enhances picking and returns efficiency gives each person or system the information needed at the moment it is needed.
A useful workflow may look like this:
The warehouse management system identifies the required product.
A picker locates the item using a clear SKU or location reference.
The barcode is scanned and checked against the order.
The product is packed using the correct box or packaging format.
The variable label connects the product, order, and shipment.
Returns information helps the customer follow the correct process.
A return identifier allows the warehouse team to recognise and route the item.
The returned product is assessed and moved to the appropriate next stage.
When labels are clear and consistent, fewer decisions need to be made from memory.
That matters during everyday fulfilment. It matters even more when order volumes rise, temporary team members join, and every packing bench is moving quickly.
Why Simple Label Layouts Matter
Simple label layouts for SKUs are easier to read, scan, check, and explain.
A label does not become more useful because every available piece of data has been squeezed onto it. In fact, too much information can make the details that matter harder to find.
An effective operational label should create a clear hierarchy.
Primary Information
This is the information a person or scanner needs first.
It may include:
SKU.
Product or variant reference.
Main barcode.
Order reference.
Return reference.
Secondary Information
This supports checking and exception handling.
It may include:
Product name.
Size.
Colour.
Quantity.
Batch information.
Market or language.
Packing notes.
Tertiary Information
This may be useful, but it should not compete with the main task.
It can include:
Internal production references.
Supplier codes.
Secondary tracking data.
Customer messaging.
Disposal or recycling guidance.
The most important information should be visually prominent and placed in a consistent location.
When operators have to search for a SKU on every pack, the label is creating work rather than removing it.
Designing Labels For First-Time Scanning
Accurate scanning on the first attempt can support faster picking, checking, dispatch, and returns handling.
Barcode performance depends on more than the code itself. The complete application should be reviewed, including:
Print quality.
Contrast.
Label material.
Surface texture.
Label position.
Curves or folds.
Glare.
Damage during handling.
Scanner type.
Scanning distance.
Lighting.
Data accuracy.
Avoid placing a barcode:
Across a box edge.
Over a fold.
On a heavily textured area.
Beneath reflective material where glare affects readability.
Where a closure, tape, or label may cover it.
In a position likely to be damaged during packing.
Beside several competing codes without a clear hierarchy.
The barcode should also be printed at a size and quality suitable for the intended scanning system. Exact technical requirements should be confirmed with the barcode, software, equipment, or label provider responsible for the workflow.
A barcode that looks tidy is not enough. It needs to work.
Human-Readable Information Still Matters
Scanners are central to many warehouse processes, but labels also need to support people.
Human-readable information helps when:
A scanner is unavailable.
A code is damaged.
A product requires visual checking.
Two similar variants need to be distinguished.
A return reaches an exception process.
A picker needs to confirm size, colour, or quantity.
A team member is investigating an error.
Place the readable SKU or product reference close to the related barcode. This helps operators understand what they are scanning and reduces the risk of checking the wrong part of the label.
Use:
Clear typography.
Strong contrast.
Consistent spacing.
Recognisable field names.
Short, controlled references.
Enough separation between different codes.
Avoid relying on colour alone to distinguish products or workflow stages. Labels need to remain understandable under different lighting conditions and for people with different visual needs.
Reducing Visual Competition On Packaging
Presentation quality and operational efficiency do not need to be rivals.
The customer-facing areas of e-commerce boxes can carry the brand experience, while operational data is placed where it remains visible and accessible without dominating the design.
Consider separating information into zones.
Customer-Facing Zone
This may include:
Brand name.
Campaign artwork.
Opening guidance.
Customer message.
Product story.
Disposal or reuse information.
Operational Zone
This may include:
SKU.
Barcode.
Order reference.
Routing data.
Return identifier.
Warehouse or carrier information.
The operational zone should be easy to locate and consistent across packaging formats.
When data placement changes between every box size, brand, or supplier, staff must spend more time searching. Standard positioning helps teams work faster and supports easier training.
Good packaging design knows when to perform and when to get out of the way.
Variable Data And Warehouse Management Systems
Variable data is most useful when it connects properly with existing warehouse management systems.
The workflow may involve:
Product information.
Inventory records.
Order management.
Warehouse locations.
Picking systems.
Packing stations.
Carrier platforms.
Returns portals.
Customer service systems.
Reporting tools.
Before changing a label or packaging format, map where each piece of data comes from and where it goes next.
Ask:
Which system owns the SKU?
Where is the barcode generated?
Which field identifies the order?
How are product variants controlled?
Which data is required for returns?
What happens when information is missing?
Who approves label layouts?
How are changes tested?
How are obsolete versions removed?
Which system records a failed scan or exception?
The print layout should support the data flow, not attempt to fix unclear data ownership with increasingly complicated labels.
A Practical Variable Data Workflow
A controlled variable data process may follow these stages:
Define the operational task. Decide whether the label supports picking, packing, dispatch, returns, or several connected processes.
Identify the essential fields. Include only the data required to complete those tasks.
Confirm the data source. Record which system owns and updates each field.
Create a fixed layout. Give SKUs, barcodes, and returns information consistent positions.
Set data rules. Define field lengths, approved characters, fallback values, and exception handling.
Generate test labels. Include short, long, common, and unusual data examples.
Test scanning. Use the real scanners, packaging materials, and working environment.
Run a warehouse trial. Include pickers, packers, returns teams, and system owners.
Record failures. Note unreadable codes, confusing fields, damaged labels, and workflow delays.
Refine the layout. Remove unnecessary detail and improve hierarchy.
Approve the specification. Lock the layout, materials, data rules, and production method.
Monitor production. Check that live labels match the approved version.
Testing the widest possible data variation is important. A layout that works with a six-character SKU may fail when a longer reference is introduced.
Improving Picking Efficiency
Variable data solutions for e-commerce picking can support clearer, more repeatable decisions on the warehouse floor.
Labels may help staff:
Identify the correct product.
Distinguish similar variants.
Confirm quantity.
Locate stock.
Match an item to an order.
Select the correct packaging.
Verify a pick before packing.
Route an exception.
Record a completed task.
To improve picking efficiency:
Keep SKU formats consistent.
Make key product differences visible.
Avoid similar-looking codes where possible.
Position information consistently.
Test the label at the distance from which it will be read.
Confirm compatibility with handheld and fixed scanners.
Use plain descriptions where a reference alone may be unclear.
Remove data that does not support the picking task.
Enhancing picking efficiency with data analytics may help teams identify recurring errors or delays, but the label itself still needs to be simple. Analysis can show where the problem occurs. Clear design helps prevent it happening again.
Supporting Faster, Clearer Returns
Optimising the returns process with variable data begins before the order leaves the warehouse.
A return may need to connect:
The customer.
The original order.
The returned product.
The product variant.
The reason for return.
The return route.
The warehouse destination.
The refund or exchange process.
The item’s final disposition.
Useful returns information may appear on:
A removable label.
An enclosed return document.
A QR code.
A customer account page.
The external packaging.
An internal product or order label.
The best format depends on the operating model and customer journey.
Effective returns information should be:
Easy to find.
Easy to understand.
Linked to the correct order.
Suitable for the relevant return method.
Clear about the next action.
Controlled by the appropriate system.
Available in the required language.
Kept separate from unnecessary internal data.
Avoid filling the customer-facing pack with warehouse terminology. The customer needs a clear action. The returns team needs reliable identification. Those needs can be connected without presenting the same information in the same way.
What Makes Returns Data Useful?
Returns data should help the receiving team answer practical questions quickly.
For example:
Which order is this from?
Which product and variant has been returned?
Was more than one item expected?
Which return route applies?
Does the item need inspection?
Where should it go next?
Is the return linked to an exchange?
Is additional information required?
Where a barcode or QR code is used, include enough human-readable information to support exception handling.
The return identifier should also remain usable after the customer has opened and resealed the pack. Test whether it is likely to be torn, covered, removed, or damaged during the journey.
Packaging That Supports Returns
Packaging e-commerce orders for both dispatch and returns may help reduce the need for customers to find another box or bag.
Where a pack is designed for reuse, consider:
A second closure.
Clear opening instructions.
Space for a returns label.
Removal or covering of old routing information.
Protection of the product on the return journey.
Clear disposal guidance if the pack is not reused.
Whether opening damages the structure.
Whether variable information remains legible.
The variable data article should stay focused on label layout and workflow rather than general courier rules. Carrier, legal, or market-specific return requirements should be confirmed separately.
For the next stage of the content journey, see Copy that helps with recycling and reuse.
Read The Blog →
Preventing Competing Barcodes
E-commerce boxes may carry several codes from different systems.
These can include:
Product barcodes.
Internal warehouse codes.
Order references.
Carrier labels.
Returns codes.
Supplier tracking labels.
Quality-control references.
When several codes appear close together, scanners or staff may select the wrong one.
Reduce this risk by:
Separating codes into clear zones.
Removing obsolete labels.
Covering or cancelling codes that are no longer active.
Giving each code a clear purpose.
Using consistent positioning.
Training teams on the intended scanning sequence.
Testing automatic scanning equipment with the complete pack.
Avoiding decorative elements that resemble operational codes.
The goal is not to make every code prominent. It is to make the correct code prominent at the correct stage.
Peak Season Planning
Peak season puts label design, system integration, stock availability, and supplier reliability under pressure.
Before volumes increase:
Confirm forecast quantities.
Review label and consumable stock.
Check printer capacity.
Test backup equipment.
Approve alternative materials.
Validate seasonal SKUs.
Remove obsolete product data.
Test the longest variable fields.
Brief temporary team members.
Display approved label examples.
Confirm supplier lead times.
Agree escalation contacts.
Review returns capacity.
Test every active packaging format.
Monitor scan failures and reprints.
A process that relies on one person remembering a workaround is not ready to scale.
Peak planning should reduce exceptions, simplify training, and make it easier to see when something has gone wrong.
Supplier Reliability And Print Consistency
Supplier reliability matters when printed labels, variable data materials, or e-commerce boxes are part of a time-sensitive fulfilment process.
Ask suppliers:
Can the material be printed consistently across batches?
Is it suitable for the selected printer or production method?
How does it perform on the intended packaging surface?
What lead times apply during peak periods?
Are backup materials available?
How are artwork and data files checked?
What quality controls are completed?
Can variable versions be packed and labelled clearly?
How are reorders controlled?
What happens when a specification changes?
Can sustainability claims be documented?
Who manages production issues?
Where labels are pre-printed with variable data, confirm how the supplier prevents:
Duplicate references.
Missing numbers.
Incorrect sequences.
Mixed versions.
Unreadable codes.
Mislabelled cartons.
Obsolete data entering production.
A premium printed label is only useful when the right version reaches the right packing station.
Evaluating Total Cost Of Ownership
Cutting costs does not always mean choosing the lowest price per label.
The total cost may include:
Label stock.
Printing equipment.
Ink, toner, or ribbon.
Software.
Integration.
Maintenance.
Reprints.
Failed scans.
Packing delays.
Picking errors.
Returns handling.
Training.
Stockholding.
Obsolete labels.
Supplier changes.
Production downtime.
When comparing options, ask:
How many label formats are required?
Can one layout support several products or brands?
Are labels printed on demand?
How much stock may become obsolete?
How often are labels reprinted?
Does the process require manual data entry?
Can errors be traced?
What happens when the system is unavailable?
How much time is spent resolving failed scans?
The strongest efficiency and productivity gains usually come from making the full process more reliable, not simply negotiating a fraction from the unit price.
Sustainability In Variable Data Packaging
Sustainability in business should be supported by specific information.
When assessing labels and packaging, ask about:
Label face material.
Recycled content, including the percentage.
FSC-certified paper options.
Adhesive.
Release liner.
Coatings.
Ink or print method.
Recyclability.
Material separation.
Packaging box composition.
Print-on-demand options.
Obsolete stock.
Minimum order quantities.
Supplier documentation.
Variable data may help reduce pre-printed packaging variations because information can be added later in the process. However, any claim that this reduces waste or environmental impact should be supported by evidence from the actual operating model.
Use clear, documented language such as:
Recyclable.
Made with a stated percentage of recycled content.
FSC-certified options available.
Plastic-free options available.
Responsibly sourced.
Avoid unsupported phrases such as:
100% sustainable.
Zero-waste.
Planet-saving.
Carbon-neutral, unless formally certified.
The label may be small. The claim still needs proof.
Common Variable Data Problems
The Barcode Does Not Scan Reliably
Check:
Print quality.
Contrast.
Label damage.
Surface texture.
Glare.
Position over folds or edges.
Scanner settings.
Data construction.
Print size.
Whether another nearby code is being detected.
The SKU Is Difficult To Find
Check:
Visual hierarchy.
Typography.
Placement.
Competing information.
Inconsistent layouts.
Whether the readable SKU is close to the barcode.
Whether several internal references look too similar.
Long Product Names Break The Layout
Check:
Maximum field lengths.
Text wrapping rules.
Abbreviations.
Font-size changes.
Fixed and variable zones.
Whether the full product name is necessary for the task.
The Wrong Label Is Applied
Check:
Print and application sequence.
Batch separation.
Packing station workflow.
Data validation.
Label orientation.
Manual data entry.
Reprint controls.
Whether unused labels remain on the bench.
Returns Reach The Wrong Area
Check:
Return identifier.
Routing data.
Warehouse destination.
Code hierarchy.
Customer instructions.
Whether the label remains intact.
Integration between returns and warehouse systems.
Too Many Labels Appear On The Pack
Check:
Which information is still active.
Whether old routing labels can be removed or covered.
Whether systems can share data.
Whether one label can serve more than one operational purpose.
Whether customer-facing and internal data can be separated more clearly.
Measuring Whether The New Layout Works
The brief calls for proof that variable data improves operational efficiency. Relevant measures may include:
First-attempt scan performance.
Average picking time.
Packing time.
Reprint volume.
Picking errors.
Mislabelled orders.
Exceptions per shift.
Returns identification time.
Time to route a returned item.
Training time.
Label stockholding.
Obsolete label volume.
Downtime linked to printing or scanning.
Customer contacts about returns instructions.
Choose measures before the trial begins. Compare the existing and proposed layouts under similar operating conditions.
Do not assume that a redesigned label has improved performance because it looks clearer. Test it with the people, equipment, data, and packaging involved.
A Variable Data Implementation Checklist
Before launching a new label or packaging workflow, confirm that:
The operational purpose is defined.
Essential data fields are agreed.
Each field has a confirmed system owner.
SKUs have a consistent location.
Barcodes are clearly separated.
Human-readable references are included.
The layout works with short and long data.
The label has been tested on the real packaging.
Scanners have been tested in the working environment.
Customer and warehouse information are clearly separated.
Returns identifiers remain usable after opening.
Duplicate and obsolete codes are controlled.
Reprint procedures are documented.
Exception handling is clear.
Packing and returns teams have reviewed the layout.
Peak-season quantities are planned.
Backup materials and equipment have been considered.
Sustainability claims are supported by evidence.
The approved specification is recorded.
Performance measures are ready for review.
Make Every Scan And Step Count
Variable data works best when it is simple enough to use at speed and controlled enough to trust.
A clear SKU, a readable barcode, and well-placed returns information can help connect picking, packing, delivery, and returns without allowing operational detail to take over the customer experience.
By mapping the data, simplifying the layout, testing with real equipment, and working with reliable suppliers, high-volume e-commerce operations can create packaging that looks polished and keeps moving.
Explore Printed Stickers And Packaging Accessories →
FAQs
What Is Variable Data And How Does It Apply To E-Commerce Packaging?
Variable data is information that changes between individual labels, packs, products, or orders. In e-commerce packaging, it can include SKUs, barcodes, order references, returns identifiers, product variants, and customer-specific details.
How Can Variable Data Improve E-Commerce Operational Efficiency?
Well-structured variable data can help teams identify products, verify picks, route orders, and process returns using consistent information. Its effectiveness depends on data accuracy, layout clarity, system integration, and reliable scanning.
What Are The Benefits Of Simple Label Layouts For SKUs And Barcodes?
Simple layouts make key information easier to locate and reduce competition between operational fields. They can also support faster training, clearer exception handling, and more consistent scanning across packaging formats.
How Does First-Attempt Scanning Affect Picking And Returns?
A successful first scan reduces the need to reposition packs, enter data manually, or investigate unreadable codes. The effect on overall performance should be measured using the actual warehouse process.
How Can Packaging Balance Premium Presentation And Fulfilment Speed?
Separate customer-facing branding from operational data, and give each a clear zone. Keep operational labels consistent and easy to access while allowing the main packaging design to carry the brand experience.
How Does Variable Data Integrate With Warehouse Management Systems?
The label layout draws changing information from systems managing products, stock, orders, picking, dispatch, and returns. Each data field should have a defined source, owner, format, and exception process.
What Should E-Commerce Teams Consider During Peak Seasons?
Teams should confirm stock, printer capacity, seasonal SKUs, backup materials, supplier lead times, temporary staff training, and returns capacity. Label layouts should be tested with the widest expected data variations before volumes rise.
Why Is Supplier Reliability Important?
Inconsistent materials, delayed deliveries, mixed versions, or poor print quality can interrupt fulfilment. Reliable suppliers should provide clear specifications, quality controls, change management, and evidence for performance and sustainability claims.
How Can Sustainable Packaging Align With Operational Goals?
Materials should be evaluated for composition, recycled content, certification, recyclability, and compatibility with the full packaging system. Print-on-demand or reduced label variation may support operational goals, but environmental benefits should be evidenced.
What Information Should Be Included For Returns?
Returns information may include an order or return identifier, product reference, routing information, and clear customer instructions. Include only what each user needs, and make sure the identifier remains readable after the packaging has been opened.
/* Blog only: prevents link/button/table/FAQ styles leaking across the website */
.variable-data-picking-returns-blog a:not(.pill-outline){
color: #30acd9 !important;
font-weight: 700 !important;
text-decoration: underline !important;
text-underline-offset: 3px;
}
/* Pill outline button */
.variable-data-picking-returns-blog .pill-outline,
.variable-data-picking-returns-blog a.pill-outline{
display: inline-flex;
align-items: center;
justify-content: center;
gap: 10px;
padding: 12px 26px;
border: 2px solid #111;
border-radius: 9999px;
background: transparent;
color: #111 !important;
text-decoration: none !important;
font-family: inherit;
font-weight: 700;
font-size: 12px;
line-height: 1;
text-transform: uppercase;
letter-spacing: 0.08em;
cursor: pointer;
user-select: none;
transition: background-color 160ms ease, color 160ms ease, transform 120ms ease;
}
.variable-data-picking-returns-blog .pill-outline__text{
color: inherit;
font-weight: 700;
text-decoration: none !important;
}
.variable-data-picking-returns-blog .pill-outline__arrow{
color: inherit;
text-decoration: none !important;
font-size: 14px;
line-height: 1;
transform: translateY(-0.5px);
}
.variable-data-picking-returns-blog .pill-outline:hover{
background: #111;
color: #fff !important;
text-decoration: none !important;
}
.variable-data-picking-returns-blog .pill-outline:hover .pill-outline__text,
.variable-data-picking-returns-blog .pill-outline:hover .pill-outline__arrow{
color: #fff !important;
text-decoration: none !important;
}
.variable-data-picking-returns-blog .pill-outline:active{
transform: translateY(1px);
}
.variable-data-picking-returns-blog .pill-outline:focus-visible{
outline: 2px solid #e9b448;
outline-offset: 3px;
}
/* Tables */
.variable-data-picking-returns-blog .table-wrap{
width: 100%;
overflow-x: auto;
border: 1px solid rgb(234, 232, 230);
border-radius: 18px;
background: #fff;
margin: 14px 0 26px 0;
}
.variable-data-picking-returns-blog .tb-table{
width: 100%;
border-collapse: collapse;
min-width: 780px;
font-family: Arial, sans-serif;
}
.variable-data-picking-returns-blog .tb-table thead th{
text-align: left;
font-weight: 700;
font-size: 14px;
padding: 14px 14px;
border-bottom: 1px solid rgb(234, 232, 230);
background: #fafafa;
white-space: nowrap;
}
.variable-data-picking-returns-blog .tb-table td{
font-size: 14px;
line-height: 1.5;
padding: 14px 14px;
border-bottom: 1px solid rgb(234, 232, 230);
vertical-align: top;
}
.variable-data-picking-returns-blog .tb-table tbody tr:last-child td{
border-bottom: none;
}
/* FAQ */
.variable-data-picking-returns-blog .faq{
width: 90%;
max-width: 900px;
margin: 0 auto 32px auto;
font-family: Arial, sans-serif;
}
.variable-data-picking-returns-blog .faq-title{
text-align: center;
margin: 0 0 14px 0;
font-size: 24px;
line-height: 1.3;
}
.variable-data-picking-returns-blog .faq-item{
border: 1px solid rgb(234, 232, 230);
border-radius: 25px;
background: #fff;
overflow: hidden;
margin: 10px 0;
}
.variable-data-picking-returns-blog .faq-item summary{
position: relative;
list-style: none;
cursor: pointer;
padding: 16px 56px 16px 18px;
font-weight: 700;
font-size: 16px;
line-height: 1.4;
outline: none;
user-select: none;
}
.variable-data-picking-returns-blog .faq-item summary::-webkit-details-marker{ display: none; }
.variable-data-picking-returns-blog .faq-item summary::after{
content: "\25B8";
position: absolute;
right: 18px;
top: 50%;
transform: translateY(-50%);
transition: transform 160ms ease;
font-size: 18px;
line-height: 1;
opacity: 0.8;
}
.variable-data-picking-returns-blog .faq-item[open] summary::after{
transform: translateY(-50%) rotate(90deg);
}
.variable-data-picking-returns-blog .faq-content{
padding: 12px 18px 18px 18px;
margin-top: 6px;
font-size: 15px;
line-height: 1.6;
color: #333;
border-top: 1px solid rgb(234, 232, 230);
background-color: #fff;
}
.variable-data-picking-returns-blog .faq-item summary:hover{ background: #fafafa; }
.variable-data-picking-returns-blog .faq-item summary:focus-visible{
outline: 2px solid #e9b448;
outline-offset: 2px;
border-radius: 18px;
}
@media (max-width: 600px){
.variable-data-picking-returns-blog .faq-title{ font-size: 22px; }
.variable-data-picking-returns-blog .faq-item summary{ font-size: 15px; padding: 14px 48px 14px 16px; }
.variable-data-picking-returns-blog .faq-content{ font-size: 14px; padding: 14px 16px 16px 16px; margin-top: 4px; }
.variable-data-picking-returns-blog .tb-table{ min-width: 720px; }
}
EPR Legislation In The UK: What It Means For Your Packaging
EPR Legislation In The UK: What It Means For Your Packaging
Packaging has always had a job to do. It protects your product, carries your brand, creates that all-important first impression, and, when done beautifully, turns an order into an experience.
Now, it also comes with a little more admin.
Extended Producer Responsibility, usually shortened to EPR, is changing how UK businesses think about packaging. The aim is simple enough: businesses that place packaging on the UK market may need to take more responsibility for what happens to that packaging after it has been used.
The details, however, can feel less simple. Thresholds, packaging classes, reporting periods, nation data, RAM ratings, PRNs. There’s a lot of terminology for something that often starts with a box, a bag, or a mailer.
This guide breaks down what EPR does, who it may affect, what information you may need to collect, and how to start preparing your packaging records with confidence.
Please note: This article provides general information only and is not legal, tax or regulatory advice. Businesses should consult the official GOV.UK EPR guidance or a qualified compliance adviser regarding their own obligations. EPR rules can change, so always check the latest official guidance or speak to a qualified compliance scheme if you’re unsure.
Need packaging that feels considered from the first touch?
Shop Gift Boxes →
What Is EPR Packaging Legislation?
EPR stands for Extended Producer Responsibility.
In plain English, it means that businesses responsible for packaging may need to help cover the cost of dealing with packaging waste. This includes reporting packaging data and, for some larger organisations, paying fees based on the packaging they place on the UK market.
According to GOV.UK’s EPR guidance, the way UK organisations responsible for packaging carry out their recycling responsibilities has changed. If your business is affected, you may need to report packaging data and pay fees based on that data.
The legislation is intended to encourage packaging that is easier to recycle, alongside improved reporting and greater transparency.
In other words, your packaging still needs to look beautiful. It just needs to bring its paperwork with it.
Why Does EPR Matter For Businesses?
EPR matters because packaging is no longer just a purchasing decision. For affected businesses, it can become a reporting, compliance, and cost-planning decision too.
Depending on your business size and packaging activity, EPR may affect:
What packaging data you need to collect.
How often you need to report packaging data.
Whether you need to register with the relevant environmental regulator.
Whether you need to pay fees.
Whether you need to assess how recyclable your packaging is.
How you brief suppliers, manufacturers, and fulfilment partners.
GOV.UK states that affected organisations may need to collect and report data, pay waste disposal fees, pay scheme administrator costs, pay charges to the environmental regulator, obtain PRNs or PERNs, and report nation data, depending on their producer status and activities.
For many brands, this means keeping clearer records of the packaging they use, including material type, weight, packaging class, and how the packaging is supplied.
This does not mean packaging has to become plain, cold, or purely functional. Many businesses are now aiming to balance brand experience, product protection, customer presentation, and responsible material choices.
That’s the sweet spot.
Does EPR Apply To My Business?
EPR may apply if your organisation imports or supplies packaging in the UK and meets certain turnover and tonnage thresholds.
According to GOV.UK guidance on who is affected, you may need to collect and report packaging data for a given year if all of the following apply:
You’re an individual business, subsidiary, or group.
You have an annual turnover of £1 million or more.
You were responsible for importing or supplying more than 25 tonnes of packaging to the UK market in the previous calendar year.
You carry out one or more packaging activities covered by the regulations.
Packaging activities can include:
Supplying packaged goods to the UK market under your own brand.
Placing goods into packaging.
Importing products in packaging.
Supplying empty packaging.
Hiring or loaning reusable packaging.
Owning an online marketplace where non-UK businesses sell goods into the UK.
This means EPR can apply to a wide range of businesses, from product brands and retailers to importers, packaging suppliers, and marketplace operators.
If you’re a smaller business below the turnover or packaging weight thresholds, you may not need to act under EPR. However, it’s still worth understanding the rules, especially if your business is growing, your order volumes are increasing, or you’re starting to sell through new channels.
Small Producers And Large Producers: What Is The Difference?
EPR separates affected organisations into small producers and large producers. This matters because your producer status affects what you may need to collect, report, register for, and pay.
Small Producers:
A small producer is generally an organisation that meets one of the following conditions:
Annual turnover of more than £1 million and up to £2 million, and supplies more than 25 tonnes of packaging in the UK.
Annual turnover of more than £1 million, and supplies more than 25 tonnes but no more than 50 tonnes of packaging in the UK.
GOV.UK’s small producer guidance explains that small producers may need to register with the regulator, pay a fee, and collect and report packaging data.
Small producers usually report data yearly. GOV.UK states that small producers must report data about packaging supplied in the previous calendar year by 1st April of the following year. For example, packaging data for January to December 2025 must be reported by 1st April 2026.
Large Producers:
A large producer is generally an organisation that has:
Annual turnover of £2 million or more.
Responsibility for supplying or importing more than 50 tonnes of packaging in the UK.
Large producers have wider reporting responsibilities. GOV.UK’s reporting periods and deadlines guidance states that large producers must collect and submit packaging data every 6 months.
Large producers may also need to pay waste disposal fees, scheme administrator costs, regulator charges, and meet recycling obligations. GOV.UK’s recycling obligations and waste disposal fees guidance explains that large organisations must fund an equivalent amount of recycling by buying PRNs or PERNs, and that waste disposal fees apply to household packaging, commonly binned packaging, and glass household drinks containers.
Small Producer Vs Large Producer At A Glance
Producer Type
Typical Threshold
Reporting Frequency
Potential Responsibilities
Small Producer
More than £1 million turnover and more than 25 tonnes of packaging, without meeting the large producer threshold.
Usually yearly.
Register, pay a fee, collect and report packaging data.
Large Producer
£2 million or more turnover and more than 50 tonnes of packaging supplied or imported in the UK.
Every 6 months.
Collect and report packaging data, register, pay relevant fees, meet recycling obligations, and assess recyclability where required.
Use this as a guide only. Always check the latest official GOV.UK guidance for your own organisation.
Reviewing your packaging range?
Explore Postal Boxes →
What Counts As Packaging Under EPR?
Packaging is any material used to contain, protect, handle, deliver, or present goods.
That can include obvious items like boxes, bags, mailers, tissue paper, tape, product cartons, sleeves, labels, and inserts. It can also include packaging that is designed to be filled at the point of sale, such as a takeaway cup.
GOV.UK’s packaging data guidance also notes that packaging can make goods look appealing for sale and may display a company’s logo or brand.
This is an important point for brand-led businesses. Your branded box, luxury bag, or printed mailer is not just decoration. It’s part of your customer experience, and it may also form part of your packaging reporting.
Key Packaging Terms Explained
EPR uses specific packaging classes. These are worth getting familiar with, because they help determine how packaging is reported.
Primary Packaging: Primary packaging is the packaging that contains a single sales unit for the final user. For example, a jewellery box, candle box, bottle box, or product carton.
Secondary Packaging: Secondary packaging groups several sales units together. For example, a box that holds multiple individual product boxes.
Shipment Packaging: Shipment packaging is used to send one or more items to a customer. For example, a postal box, mailing bag, or protective outer packaging used for delivery.
Tertiary Packaging: Tertiary packaging is usually used for transport and handling between businesses. For example, pallet wrap, pallets, or bulk transit packaging.
Household Packaging: Household packaging is packaging that is likely to be disposed of by a household or in a public bin. GOV.UK’s household and non-household packaging guidance states that primary and shipment packaging must be classed as household unless it meets specific conditions.
Non-Household Packaging: Non-household packaging is packaging that is not expected to end up in household or public bins. GOV.UK guidance states that secondary and tertiary packaging must be classed as non-household.
Primary and shipment packaging can only be classed as non-household in specific circumstances. If you report primary or shipment packaging as non-household, you must be able to show sufficient evidence and keep that evidence for at least 7 years.
What Data Might You Need To Collect?
The exact data you need depends on whether you’re a small or large producer, and what packaging activities you carry out.
GOV.UK’s packaging data guidance states that affected organisations must collect and report data about packaging supplied within or to the UK market. The guidance also states that data and supporting evidence must be kept for at least 7 years.
In general, affected organisations may need to collect information about:
Packaging activity, meaning how the packaging was supplied.
Packaging type, such as household or non-household.
Packaging class, such as primary, secondary, shipment, or tertiary.
Packaging material.
Packaging weight.
Quantity of packaging supplied.
Nation data, if relevant.
Recyclability assessment data, if relevant.
Materials may include paper and board, fibre-based composite materials, plastic, steel, aluminium, glass, wood, and other material categories.
For practical purposes, this means businesses should start building a clear packaging record. A spreadsheet is often a sensible starting point.
You may want to record:
Product or packaging SKU.
Packaging item name.
Supplier.
Material.
Weight in kilograms.
Packaging class.
Whether it’s used for retail, gifting, shipping, wholesale, or internal transport.
Whether it’s branded or plain.
Whether it’s supplied to a customer, retailer, distributor, or end user.
Evidence for non-household classification, where applicable.
The earlier you build the habit, the less painful reporting becomes. Future-you will be very grateful.
Example Packaging Record
Packaging Item
Material
Packaging Class
Weight
Used For
Postal box
Paper / board
Shipment
Record in kg
Sending ecommerce orders to customers.
Product gift box
Paper / board
Primary
Record in kg
Containing and presenting one sales unit.
Tissue paper
Paper
Primary or shipment, depending on use
Record in kg
Product presentation, protection, or reveal.
Outer transit carton
Corrugated board
Tertiary
Record in kg
Bulk transport between businesses.
This is not a reporting template, but it shows the sort of information worth keeping close. Your actual reporting requirements will depend on your organisation and the packaging activities you carry out.
What Is Nation Data?
Nation data is information about where packaging is supplied in the UK and where it’s discarded.
GOV.UK explains that affected organisations must submit nation data if they carry out certain activities, including supplying filled or empty packaging directly to customers in the UK where they are the end user, supplying empty packaging to organisations that are not legally obligated or are small organisations, hiring or loaning reusable packaging, owning certain online marketplaces, or importing packaged goods for their own use and discarding the packaging.
You can read the full criteria in the official GOV.UK packaging data guidance.
What Is RAM And Why Does Recyclability Matter?
RAM stands for Recyclability Assessment Methodology.
It’s the system used to assess the recyclability of certain packaging. GOV.UK’s RAM guidance states that only large producers must collect and report recyclability assessment data. It applies to household packaging, packaging that commonly ends up in public bins, and household drinks containers made of glass.
Under the Recyclability Assessment Methodology, relevant packaging is assessed against criteria that determine a Red, Amber or Green rating. That rating affects the disposal fee charged for that packaging. This is known as fee modulation.
In simple terms, packaging that is assessed as being more recyclable is intended to attract lower disposal fee modulation than packaging that’s harder to recycle.
This is why material choices matter. Paper and board packaging, plastic windows, laminations, mixed materials, coatings, ribbons, magnets, foils, and inserts can all affect how a packaging item is assessed.
That does not mean every beautiful finish has to disappear. It means businesses need to understand what their packaging is made from and make more informed choices.
For example:
Can the amount of packaging be reduced without damaging the unboxing experience?
Can you choose a widely recyclable board?
Can you avoid unnecessary mixed materials?
Can you keep premium details, but use them with more intention?
Can you ask your packaging supplier for material details and weights?
Good packaging should still feel elevated. The difference is that it should also be easier to explain.
What Actions Should Businesses Take?
If you think EPR may apply to your business, start with these steps:
1. Check Whether You Meet The Thresholds.
Look at your annual turnover and the total weight of packaging you supplied or imported in the relevant previous calendar year.
Remember, if your business is part of a group, you may need to consider group-level turnover and packaging weight, not just one individual company. GOV.UK’s guidance explains how parent companies, groups, and subsidiaries should approach EPR reporting.
2. Identify Your Packaging Activities.
Work out how your business handles packaging. Do you sell products under your own brand? Import goods in packaging? Fill packaging? Supply empty packaging? Run an online marketplace?
Your activity affects what you may be responsible for. The official GOV.UK packaging activities section is a useful place to check this.
3. Build A Packaging Data Record.
Create a central record of the packaging your business uses or supplies. Include material, weight, class, quantity, and supplier information.
If you do not know the packaging weight or material composition, ask your supplier. This is especially important if you use multiple components, such as boxes, tissue, stickers, inserts, bags, ribbons, and mailing cartons.
For more detail on what to collect, use GOV.UK’s packaging data collection guidance.
4. Decide Whether Packaging Is Household Or Non-Household.
For large producers, household and non-household classification matters. Most primary and shipment packaging is classed as household unless it meets specific conditions.
If you classify primary or shipment packaging as non-household, you must be able to evidence why. GOV.UK’s household and non-household packaging guidance explains what counts and what evidence may be needed.
5. Check Your Reporting Deadlines.
Large producers generally report packaging data every 6 months. Small producers report yearly.
Current reporting periods and deadlines are explained in GOV.UK’s packaging data deadlines guidance. Because deadlines can change, it’s worth checking the latest version before each reporting period.
6. Register If You Need To.
If your organisation is obligated, you may need to create an account through the Report Packaging Data service and register with the relevant environmental regulator.
GOV.UK’s registration guidance explains that obligated organisations must register with the environmental regulator and pay a registration fee.
7. Consider Whether You Need A Compliance Scheme.
A compliance scheme is a third party that can help with EPR requirements. It may be able to register your organisation, submit packaging data, and help with PRNs or PERNs.
GOV.UK’s EPR guidance collection includes a section on compliance schemes and public registers. Always check that any scheme you use appears on the official register.
8. Review Your Packaging Choices.
EPR is a good moment to look at your packaging with fresh eyes.
Ask:
Is every component needed?
Does each layer add protection, presentation, or brand value?
Are materials easy to identify?
Could you reduce packaging weight?
Could you switch to a more widely recyclable option?
Could branded packaging help your product feel more premium without adding unnecessary layers?
Packaging should never be an afterthought. Under EPR, it pays to make it considered from the start.
Want to make every layer work harder?
Explore Printed Packaging →
How Tiny Box Company Can Help You Make More Considered Packaging Choices
At Tiny Box Company, we believe packaging is part of the brand experience. It’s the first thing your customer sees, touches, opens, and remembers.
But beautiful packaging should also be practical, carefully chosen, and easier to understand.
When you’re reviewing packaging for EPR, it helps to think about three things:
Material: Know what your packaging is made from. Look for clear material information and avoid making sustainability claims unless you can support them.
Weight: Packaging weight matters for reporting. If you’re comparing options, lighter packaging may help reduce the total packaging weight your business places on the market.
Purpose: Every packaging layer should earn its place. A postal box protects. Tissue creates a reveal. Ribbon adds a finishing moment. A branded sticker seals the experience.
The goal is not to strip everything back until it feels forgettable. The goal is to choose with intention.
A polished packaging experience can still support responsible packaging choices. It just needs to be designed with both the customer and the compliance spreadsheet in mind.
Where To Find Further EPR Guidance
For the most accurate and current information, use official sources first.
Useful places to start include:
GOV.UK: Extended Producer Responsibility For Packaging
GOV.UK: Who Is Affected And What To Do
GOV.UK: What Small Producers Must Do
GOV.UK: Packaging Data To Collect
GOV.UK: Reporting Periods And Submission Deadlines
GOV.UK: Household And Non-Household Packaging
GOV.UK: Recyclability Assessment Methodology
GOV.UK: Report Packaging Data
PackUK, the scheme administrator for the UK’s packaging EPR programme
The Producer Responsibility Obligations (Packaging And Packaging Waste) Regulations 2024
Because EPR guidance is updated regularly, it’s worth checking GOV.UK before each reporting period.
Final Thought
EPR may add another layer to packaging planning, but it does not take away the value of a beautiful unboxing experience.
Your packaging can still feel premium, considered, and completely on-brand. The key is knowing what you use, why you use it, and how it performs after your customer has opened it.
Because the best packaging does more than protect a product. It protects the first impression too.
Ready to make packaging feel more considered?
Speak To Our Team →
FAQs
What Does EPR Stand For?
EPR stands for Extended Producer Responsibility. For packaging, it means certain businesses that supply or import packaging may need to report packaging data and, depending on their size and responsibilities, pay fees connected to the cost of managing packaging waste. You can read the official overview on GOV.UK.
Does EPR Apply To Small Businesses?
It depends on your turnover, packaging tonnage, and packaging activities. GOV.UK states that organisations may need to collect and report packaging data if they have annual turnover of £1 million or more, were responsible for importing or supplying more than 25 tonnes of packaging to the UK market in the previous calendar year, and carry out covered packaging activities. If your business is growing quickly, it’s sensible to track packaging use early, even if you’re not currently obligated.
What Is The Difference Between A Small Producer And A Large Producer?
A small producer is generally an organisation with turnover above £1 million that supplies more than 25 tonnes of packaging, but does not meet the large producer threshold. A large producer generally has turnover of £2 million or more and supplies or imports more than 50 tonnes of packaging. Large producers have wider responsibilities, including 6-monthly reporting and, in many cases, waste disposal fees and recycling obligations. You can check the latest details in GOV.UK’s producer guidance.
Do Small Producers Have To Report Packaging Data?
Yes, if they are obligated. GOV.UK’s small producer guidance states that small producers may need to register with the regulator, pay a fee, and collect and report packaging data.
What Packaging Do I Need To Report?
This depends on your business and producer status. You may need to report packaging activity, packaging type, packaging class, material, weight, and quantity. Large producers may also need to report household and non-household packaging, nation data, and recyclability assessment information where relevant. Use GOV.UK’s packaging data guidance for the official detail.
What Is Household Packaging?
Household packaging is packaging that is likely to end up in a household bin or public bin. Most primary and shipment packaging is treated as household packaging unless specific conditions apply.
What Is Non-Household Packaging?
Non-household packaging is packaging that is not expected to be disposed of by households or in public bins. Secondary and tertiary packaging are generally treated as non-household. Primary and shipment packaging can only be classed as non-household in specific circumstances, and you must keep evidence. GOV.UK’s household and non-household guidance explains this in more detail.
What Is RAM?
RAM stands for Recyclability Assessment Methodology. It’s used to assess the recyclability of certain packaging and gives packaging a red, amber, or green rating. This rating can affect disposal fees for large producers. Read the official RAM guidance on GOV.UK.
Do I Need To Use A Compliance Scheme?
You do not always have to use one, but many businesses choose to because EPR reporting can be complex. A compliance scheme can help with registration, data reporting, and PRNs or PERNs. Always check that any scheme you use appears on the official public register listed through the GOV.UK EPR guidance collection.
Can Better Packaging Choices Reduce EPR Costs?
Potentially, yes. EPR is designed to encourage packaging that is easier to recycle and more carefully designed. For large producers, recyclability ratings can affect disposal fees. Even for businesses not yet obligated, reviewing packaging weight, materials, and structure is a sensible step.
Is EPR The Same As The Plastic Packaging Tax?
No. EPR and Plastic Packaging Tax are separate. EPR focuses on responsibility for packaging waste and reporting. Plastic Packaging Tax applies to plastic packaging components that contain less than the required percentage of recycled plastic, subject to the relevant legislation and exemptions.
Where Can I Get Official Help?
Start with GOV.UK’s EPR packaging guidance, PackUK, your relevant environmental regulator, or a registered compliance scheme. If you’re unsure whether your business is obligated, speak to a qualified adviser.
/* EPR blog only: prevents link/button/table/FAQ styles leaking across the website */
.epr-blog a:not(.pill-outline){
color: #30acd9 !important;
font-weight: 700 !important;
text-decoration: underline !important;
text-underline-offset: 3px;
}
/* Pill outline button */
.epr-blog .pill-outline,
.epr-blog a.pill-outline{
display: inline-flex;
align-items: center;
justify-content: center;
gap: 10px;
padding: 12px 26px;
border: 2px solid #111;
border-radius: 9999px;
background: transparent;
color: #111 !important;
text-decoration: none !important;
font-family: inherit;
font-weight: 700;
font-size: 12px;
line-height: 1;
text-transform: uppercase;
letter-spacing: 0.08em;
cursor: pointer;
user-select: none;
transition: background-color 160ms ease, color 160ms ease, transform 120ms ease;
}
.epr-blog .pill-outline__text{
color: inherit;
font-weight: 700;
text-decoration: none !important;
}
.epr-blog .pill-outline__arrow{
color: inherit;
text-decoration: none !important;
font-size: 14px;
line-height: 1;
transform: translateY(-0.5px);
}
.epr-blog .pill-outline:hover{
background: #111;
color: #fff !important;
text-decoration: none !important;
}
.epr-blog .pill-outline:hover .pill-outline__text,
.epr-blog .pill-outline:hover .pill-outline__arrow{
color: #fff !important;
text-decoration: none !important;
}
.epr-blog .pill-outline:active{
transform: translateY(1px);
}
.epr-blog .pill-outline:focus-visible{
outline: 2px solid #e9b448;
outline-offset: 3px;
}
/* Tables */
.epr-blog .table-wrap{
width: 100%;
overflow-x: auto;
border: 1px solid rgb(234, 232, 230);
border-radius: 18px;
background: #fff;
margin: 14px 0 26px 0;
}
.epr-blog .tb-table{
width: 100%;
border-collapse: collapse;
min-width: 780px;
font-family: Arial, sans-serif;
}
.epr-blog .tb-table thead th{
text-align: left;
font-weight: 700;
font-size: 14px;
padding: 14px 14px;
border-bottom: 1px solid rgb(234, 232, 230);
background: #fafafa;
white-space: nowrap;
}
.epr-blog .tb-table td{
font-size: 14px;
line-height: 1.5;
padding: 14px 14px;
border-bottom: 1px solid rgb(234, 232, 230);
vertical-align: top;
}
.epr-blog .tb-table tbody tr:last-child td{
border-bottom: none;
}
/* FAQ */
.epr-blog .faq{
width: 90%;
max-width: 900px;
margin: 0 auto 32px auto;
font-family: Arial, sans-serif;
}
.epr-blog .faq-title{
text-align: center;
margin: 0 0 14px 0;
font-size: 24px;
line-height: 1.3;
}
.epr-blog .faq-item{
border: 1px solid rgb(234, 232, 230);
border-radius: 25px;
background: #fff;
overflow: hidden;
margin: 10px 0;
}
.epr-blog .faq-item summary{
position: relative;
list-style: none;
cursor: pointer;
padding: 16px 56px 16px 18px;
font-weight: 700;
font-size: 16px;
line-height: 1.4;
outline: none;
user-select: none;
}
.epr-blog .faq-item summary::-webkit-details-marker{ display: none; }
.epr-blog .faq-item summary::after{
content: "▸";
position: absolute;
right: 18px;
top: 50%;
transform: translateY(-50%);
transition: transform 160ms ease;
font-size: 18px;
line-height: 1;
opacity: 0.8;
}
.epr-blog .faq-item[open] summary::after{
transform: translateY(-50%) rotate(90deg);
}
.epr-blog .faq-content{
padding: 12px 18px 18px 18px;
margin-top: 6px;
font-size: 15px;
line-height: 1.6;
color: #333;
border-top: 1px solid rgb(234, 232, 230);
background-color: #fff;
}
.epr-blog .faq-item summary:hover{ background: #fafafa; }
.epr-blog .faq-item summary:focus-visible{
outline: 2px solid #e9b448;
outline-offset: 2px;
border-radius: 18px;
}
@media (max-width: 600px){
.epr-blog .faq-title{ font-size: 22px; }
.epr-blog .faq-item summary{ font-size: 15px; padding: 14px 48px 14px 16px; }
.epr-blog .faq-content{ font-size: 14px; padding: 14px 16px 16px 16px; margin-top: 4px; }
.epr-blog .tb-table{ min-width: 720px; }
}
Elevate Your Packaging with Premium Swing Tags
Elevate Your Packaging With Premium Swing Tags
Luxury is often communicated through small details.
The texture of a board. The way a string sits against a bottle, garment, or jewellery box. The satisfying weight of a tag that feels considered without becoming bulky, awkward, or expensive to handle.
A strong premium swing tags design can reinforce quality, explain a product story, carry essential information, and add another layer to the unboxing experience. It can also support seasonal campaigns without requiring a complete redesign of the primary packaging.
The challenge is finding the right balance.
Luxury swing tags that are lightweight should feel refined, remain secure, and work efficiently across production, packing, retail, and fulfilment. That means choosing board weights, string options, hole reinforcers, artwork, and finishes as part of one connected specification.
Premium does not have to mean piling on more material. Sometimes, the smartest detail is knowing when to stop.
Need Packaging Accessories to get you started?
Explore The Range →
What Makes A Swing Tag Feel Premium?
A premium swing tag combines an appropriate board, considered typography, a well-matched string or attachment, durable finishing, and clear brand detail without adding unnecessary weight or complexity.
The strongest high-end swing tags without added weight usually focus on:
A board that feels suitable for the product.
A clean, confident layout.
A string or attachment that complements the brand.
A reinforced hole where extra durability is needed.
Finishes used with purpose rather than excess.
Information that is easy to read and correctly organised.
Consistent production across every location and season.
A premium tag should look intentional from the first glance and continue to perform when it is handled, packed, transported, displayed, and removed.
Why Swing Tags Matter In Luxury Packaging
Swing tags sit at the meeting point between branding, product information, and physical experience.
For beauty, fashion, and jewellery brands, they can help:
Reinforce premium positioning.
Introduce a collection or campaign story.
Communicate care, sizing, composition, or product details.
Carry regulatory or market-specific information.
Add texture and movement to a pack.
Support gifting and limited editions.
Connect the product with digital content through a QR code.
Make seasonal packaging feel more tailored.
Create an opening or discovery moment worth photographing.
A swing tag can also make a standard packaging format feel bespoke. When the board, print, string, and product are properly coordinated, the result feels designed rather than added at the last minute.
That distinction is small on a specification sheet and very obvious in a customer’s hand.
Lightweight Luxury Starts With The Right Board
Board weight has a significant effect on how a tag feels, folds, hangs, and survives handling.
A heavier board is not automatically more premium. If it is too thick for the tag size or product, it can look clumsy, create packing problems, or overpower delicate packaging.
A lighter board is not automatically less luxurious either. A well-selected material with a refined surface and clean print can feel sophisticated while supporting lower weight and easier handling.
When comparing elegant swing tag materials, consider:
Tag dimensions.
Board stiffness.
Surface texture.
Print performance.
Fold requirements.
Hole strength.
Product weight.
String tension.
Packing method.
Shipping conditions.
Storage space.
Disposal and recycling route.
The relationship between size and board is particularly important. A small tag may feel substantial on a moderate board, while a larger tag may need more stiffness to avoid curling or bending.
Ask suppliers to provide physical samples rather than relying on board descriptions alone. Words such as “premium”, “thick”, and “luxury” are subjective. The sample is where the truth lives.
How Board Weight Affects Perceived Quality
Board weight influences more than the thickness of the tag.
It can affect:
How the tag hangs.
Whether corners remain crisp.
How foil or embossing appears.
Whether the tag bends during packing.
How easily the customer handles it.
Whether a hole tears under tension.
How much space finished tags take in storage.
The total weight added across a large production run.
The best choice should suit both the visual identity and the operating model.
For example, a delicate jewellery product may benefit from a smaller, lighter tag with precise typography and a fine attachment. A larger garment tag may need greater stiffness, especially where it carries several languages, care details, or a secondary folded panel.
The aim is not to select the heaviest option available. It is to choose the lightest board that still provides the required feel, print result, durability, and compliance space.
That is lightweight luxury with its practical shoes on.
Single-Layer, Folded, Or Multi-Part Tags?
The tag structure can add useful space, but it can also introduce bulk.
Single-Layer Swing Tags
Single-layer tags are often the simplest to produce, pack, and attach.
They can work well when:
The message is concise.
Regulatory information appears elsewhere.
The product requires a clean, minimal look.
Several languages are not needed.
Storage and packing speed are priorities.
A considered material and finish can make a single-layer tag feel highly premium without additional components.
Folded Swing Tags
Folded tags provide more communication space while keeping information grouped together.
They may suit:
Product stories.
Ingredient or material details.
Care instructions.
Multi-language content.
Gifting messages.
Digital callouts and QR codes.
The fold must remain neat, and the board should be suitable for creasing. Test whether the tag springs open, catches during packing, or becomes bulky once attached.
Multi-Part Swing Tags
Multi-part tags can separate brand storytelling, product information, and compliance content.
They offer flexibility, but every extra layer adds:
Material.
Assembly time.
Storage volume.
Packing complexity.
Opportunities for inconsistency.
Potential separation or tangling.
Use multiple tags when each piece has a clear purpose. Luxury is not measured by the number of cards tied to a string.
Choosing String And Attachment Options
String choice influences how the tag looks, moves, attaches, and feels when handled.
Board weights and string choices should be assessed together. A delicate cord may look lost against a large tag, while a thick attachment can overwhelm a smaller product.
Common considerations include:
Thickness.
Texture.
Colour.
Length.
Knot style.
Attachment method.
Product compatibility.
Resistance to fraying.
Ease of removal.
Packing speed.
Availability across repeat orders.
Material and disposal information.
Fine Cord
A fine cord can create a minimal, refined appearance.
It may suit:
Jewellery.
Small cosmetics.
Fragrance.
Accessories.
Delicate product packaging.
Check that it does not cut into the tag hole or become difficult for packing teams to handle.
Cotton Or Textile String
Textile-style string can add softness and tactile interest.
It may complement:
Natural board.
Fashion products.
Handmade collections.
Soft-touch packaging.
Brands using a warmer, less polished visual language.
Ask for evidence before making claims about fibre content, sourcing, recyclability, or biodegradability.
Ribbon
Ribbon can connect the swing tag with wider packaging details.
It may work well across:
Gift sets.
Seasonal collections.
Jewellery boxes.
Beauty launches.
Premium retail packaging.
The ribbon width should suit the hole and tag size. A bulky knot can increase packing volume or obscure the artwork, so test the completed attachment rather than reviewing each component separately.
Elastic Or Loop Attachments
Looped or elastic attachments can improve speed and reduce knotting during fulfilment.
They may suit products requiring:
Fast application.
Secure attachment.
Easy removal.
Consistent presentation.
Check how the attachment behaves over time and whether it stretches, marks, or puts pressure on the product.
Why String Length Matters
String length affects both presentation and process.
If it is too short:
The tag may sit awkwardly.
The product may be difficult to handle.
The attachment may place unnecessary tension on the hole.
The tag may cover important product detail.
If it is too long:
The string may tangle.
Tags may catch during packing.
Products may look untidy on display.
More material may be used than necessary.
The tag may move into an unintended position during photography.
Test the string on the product, inside the final packaging, and during actual packing.
A loose tag on a sample table can behave very differently once it is surrounded by tissue, inserts, closures, and other products.
The Role Of Tear-Resistant Hole Reinforcers
The punched hole is one of the smallest elements in a swing tag, but it often carries the greatest physical strain.
Tear-resistant hole reinforcers can help protect the board where:
The tag is heavy or oversized.
The attachment is narrow.
The product is handled repeatedly.
The tag hangs from a moving garment.
Several tag layers share one attachment.
The board has a softer or more fibrous structure.
The item travels through multiple distribution stages.
Reinforcement may be integrated through the tag construction or added as a separate component, depending on the material, finish, design, and production process.
The best solution should support durability without looking like an afterthought.
Consider:
Reinforcer size.
Colour.
Material.
Position.
Compatibility with the string.
Effect on recyclability.
Whether it changes the tag’s disposal guidance.
How it performs after repeated movement.
Whether it introduces unnecessary thickness.
Where possible, compare reinforced and unreinforced samples using the exact board and attachment combination.
A Simple Swing Tag Durability Test
A practical sample test can identify weak points before production.
Attach the tag to the real product.
Handle it as a customer, warehouse team, and retailer would.
Lift and move the product using normal handling points.
Rotate the tag repeatedly around the string.
Place the product into its final packaging.
Remove and repack it several times.
Check the hole for stretching, tearing, or surface damage.
Review the string for fraying or loosening.
Confirm that the printed finish remains clean.
Record the approved combination for production.
This does not replace formal supplier testing, but it helps teams compare options under realistic conditions.
Swing tags are designed to hang around. It is worth checking that they actually can.
Finishes That Add Luxury Without Bulk
Print and finishing techniques can add visual depth without requiring a thicker tag.
Options may include:
Hot foil.
Embossing or debossing.
Spot UV.
Varnish.
Textured board.
Metallic ink.
Edge colour.
Die-cut shapes.
Carefully controlled colour contrast.
Minimal, high-quality typography.
The best finish depends on the board, artwork, quantity, supply chain, and intended result.
Hot Foil
Hot foil can create a precise metallic or pigmented detail. It can be effective for logos, borders, collection names, or small accents.
The artwork should be reviewed for suitable line thickness and spacing. Fine detail may need adjustment to remain clear.
Embossing And Debossing
Embossing and debossing introduce texture through raised or recessed areas.
They can add a tactile detail without adding another printed colour, but the board must be suitable for the process. Test how the finish behaves near folds, holes, and small text.
Spot UV And Varnish
Spot UV or varnish can create contrast between gloss and matt surfaces.
Use it with restraint. A small highlight can feel deliberate, while a crowded finish can reduce legibility and make the tag look busier rather than better.
Die-Cut Shapes
A distinctive shape can make a tag more memorable and closely connect it with a product or brand motif.
Avoid shapes that:
Catch during packing.
Create fragile points.
Waste unnecessary material.
Reduce space for important information.
Become difficult to store or count.
Rotate awkwardly when attached.
Every design flourish should earn its place.
Creating Instagram-Worthy Packaging
Instagram-worthy packaging is not simply packaging with more decoration.
It usually has a clear focal point, strong colour balance, considered materials, and details that make sense together.
A swing tag can support that moment by:
Introducing a campaign phrase.
Adding a tactile finish.
Framing a logo.
Carrying a short product story.
Coordinating with a ribbon or box colour.
Providing a removable keepsake.
Leading customers to digital content.
Adding a gifting message.
Creating movement within a product photograph.
The tag should be visible when the customer first encounters the product, but it should not obscure the product itself.
Review it from the camera’s perspective as well as the packing bench. Check:
Front-facing placement.
String direction.
Tag rotation.
Reflection from glossy finishes.
Typography at mobile-screen size.
Contrast against the product.
Whether compliance information is visible in unintended photographs.
How the tag appears when the pack is opened naturally.
Photography is useful, but the physical experience still comes first. Customers may share a beautiful pack. They also need to open, read, use, and dispose of it.
Building A Cohesive Packaging System
The swing tag should feel connected to the wider packaging system.
Coordinate it with:
Bespoke boxes.
Gift bags.
Tissue paper.
Ribbon.
Product labels.
Inserts.
Care cards.
Seals.
E-commerce mailers.
Retail displays.
A cohesive packaging design box system does not require every component to use the same finish. Repetition can come through colour, type, shape, texture, or tone of voice.
For example:
A foil detail on the tag may echo the logo on a box.
The string colour may match a gift bag handle.
The board texture may complement uncoated packaging.
A die-cut shape may reflect the product silhouette.
Typography may connect the tag with care and product cards.
Explore gift tags to coordinate swing tags with boxes, bags, ribbon, and other finishing details.
Explore Gift Tags →
Information Hierarchy On Premium Swing Tags
Premium design still needs to communicate clearly.
Before adding decorative elements, decide what the customer must notice first.
A useful hierarchy may include:
Brand.
Product or collection name.
Key message.
Product information.
Care or use instructions.
Required regulatory content.
Country or market-specific information.
Digital link or QR code.
Disposal guidance.
Not every tag needs every element. Some information may be better placed on the product label, primary pack, insert, or digital page.
The swing tag should have one clear role within the information system. Trying to make one small card carry every message can create a tag that is technically complete and visually exhausting.
Regulatory Compliance Considerations
Beauty, fashion, and jewellery brands may need to manage different information requirements across products and markets.
Depending on the product and jurisdiction, teams may need to review:
Product composition.
Care information.
Safety statements.
Responsible party details.
Country-of-origin information.
Batch or traceability details.
Pricing.
Language requirements.
Disposal guidance.
Claims and substantiation.
Market-specific symbols.
Accessibility and legibility.
Best practice includes:
Maintaining approved copy by market.
Recording version numbers.
Separating permanent brand artwork from variable regulatory content.
Checking minimum readable sizes.
Confirming QR code destinations.
Reviewing translations.
Locking approved artwork before production.
Keeping evidence for material and sustainability claims.
Managing change control across suppliers.
A beautiful tag with outdated information is still outdated information.
Using Variable Data Across Markets
Global brands may use swing tags for:
Product codes.
Sizes.
Prices.
Languages.
Collection names.
QR codes.
Regional disposal guidance.
Batch information.
Market-specific promotions.
Variable data can help reduce the number of completely separate designs, but it needs controlled artwork and production workflows.
Consider:
Which information remains fixed.
Which fields change.
Who owns the data.
How files are checked.
Whether barcode or QR code quality is verified.
How variations are packed and labelled.
How obsolete versions are removed from circulation.
How returns and replacements are managed.
For more on operational uses, see Variable data that speeds picking and returns.
Read The Blog →
Sustainability Without Losing The Luxury Feel
Sustainability aspects should be built into the specification rather than added as a final claim.
When evaluating lightweight luxury swing tags, ask about:
Board composition.
Recycled content, including the stated percentage.
FSC-certified options.
Coatings and laminations.
Foils and decorative finishes.
String material.
Hole reinforcer material.
Adhesives where used.
Recyclability.
Component separation.
Production waste.
Minimum order quantities.
Packaging and transport format.
Supplier documentation.
Use specific, supportable language such as:
Recyclable.
Made with a stated percentage of recycled content.
FSC-certified options available.
Plastic-free options available.
Responsibly sourced.
Avoid unsupported phrases such as:
100% sustainable.
Zero-waste.
Planet-saving.
Carbon-neutral, unless formally certified.
A lightweight specification may also reduce material use, storage volume, and transport weight, but those benefits should only be stated where evidence is available.
Sustainability in business needs more than a tasteful green icon. It needs proof.
Balancing Luxury With Operational Efficiency
A swing tag can look flawless in a creative review and still cause difficulties during production or fulfilment.
Operational teams should assess:
Attachment time.
Knot consistency.
Tag orientation.
Tangling.
Packing speed.
Storage volume.
Counting and stock control.
Variation management.
Damage during transit.
Ease of removal.
Rework rates.
Seasonal availability.
Supplier lead times.
Pre-Strung Or Applied During Packing?
Pre-strung tags may reduce preparation time, but they can require more storage space and may tangle.
Separately supplied tags and strings may offer flexibility, but they introduce another assembly step.
Test both options with the packing team and measure:
Time per unit.
Error rate.
Tangling.
Storage needs.
Ease of training.
Appearance consistency.
Manual Or Automated Attachment?
Manual attachment may suit lower volumes, complex products, or frequent design changes.
Higher-volume programmes may require equipment or attachment formats that support faster application. The tag, hole, string, and product must all be compatible with the selected process.
Stock Complexity
Every variation adds inventory.
Before approving several boards, colours, strings, or finishes, ask:
Does each version serve a clear purpose?
Can one core tag support several markets?
Can variable data reduce separate SKUs?
Can seasonal components be standardised?
Is a finish available reliably at the required scale?
What happens if a component becomes unavailable?
Luxury works best when customers see the detail, not the complexity behind it.
Managing Cost Without Diluting The Design
Premium packaging decisions should be assessed across the full process, not only through unit price.
Review:
Board cost.
Print method.
Finishing.
Tooling.
String or attachment.
Reinforcement.
Assembly.
Sampling.
Minimum order quantities.
Storage.
Packing time.
Waste.
Rework.
Distribution.
Obsolescence risk.
A thicker tag may cost more to produce and store. A highly complex attachment may increase packing time. A seasonal design with a large minimum order may leave surplus stock.
Cost efficiency can come from:
Reducing unnecessary layers.
Standardising dimensions.
Using one board across several collections.
Keeping decorative finishes focused.
Separating variable information from core branding.
Testing string lengths carefully.
Improving packing instructions.
Consolidating orders where practical.
Recording approved specifications for repeat production.
Luxury finishes, without luxury mark-ups, starts with making every component work harder.
Evaluating Suppliers For Global Programmes
A strong supplier should understand both the design ambition and the operational demands of a global packaging programme.
Ask potential suppliers:
Which board options suit the required feel without unnecessary weight?
How will the board perform with our selected finish?
What hole and reinforcement options are available?
Which string choices work with the tag and product?
Can you provide assembled samples?
How will colours and finishes be approved?
What are the minimum order quantities?
Can you support seasonal peaks?
How are repeat orders controlled?
What sustainability documentation is available?
How are market variations packed and labelled?
What quality checks are completed?
What happens if a chosen material becomes unavailable?
Can the specification be produced consistently across locations?
How are artwork changes managed?
Where a supplier makes a performance or sustainability claim, ask for the basis of that claim.
Premium supplier relationships should reduce uncertainty, not decorate it.
A Premium Swing Tag Development Process
Use this step-by-step approach.
Define the tag’s purpose. Decide whether it is carrying brand, product, compliance, gifting, or campaign information.
Map required content. Separate essential information from optional storytelling.
Select an initial size. Check proportion against the product and packaging.
Compare board options. Review stiffness, surface, print, and handling.
Choose the attachment. Match its weight, texture, length, and colour to the tag.
Assess hole durability. Add reinforcement where the material and use require it.
Develop artwork. Create a clear hierarchy with suitable type sizes and contrast.
Review finishes. Use foil, embossing, varnish, or die-cutting with purpose.
Build complete samples. Attach the tag to the actual product and place it in the final pack.
Test handling. Review packing, transit, display, opening, and removal.
Confirm compliance. Obtain approval for copy, symbols, claims, and market variations.
Record the specification. Save the approved board, print, finish, hole, string, and packing details.
Run a production check. Compare finished units with the approved sample before full distribution.
This process supports brand consistency while reducing last-minute surprises.
Premium Swing Tag Checklist
Before approving production, confirm that:
The tag has one clear purpose.
Its size suits the product.
The board feels premium without unnecessary bulk.
The tag hangs correctly.
The string or attachment complements the design.
The chosen string length has been tested.
The hole withstands realistic handling.
Reinforcement has been assessed where needed.
Print remains clear at actual size.
Decorative finishes support rather than crowd the artwork.
Required information is readable.
Regulatory copy has been approved.
Market variations are controlled.
QR codes or barcodes have been tested.
Sustainability claims are supported by evidence.
The tag is efficient to store and apply.
Packing teams have reviewed the sample.
The finished tag has been tested in the complete packaging.
The approved specification is recorded for repeat orders.
Make The Detail Feel Deliberate
Premium swing tags do not need excessive thickness, layers, or decoration to make an impression.
The right board, a well-matched attachment, a durable hole, clear information, and one or two considered finishes can turn a simple tag into a confident brand detail.
By testing every component together, beauty, fashion, and jewellery brands can create lightweight luxury swing tags that look refined, support compliance, work efficiently, and complete the unboxing experience without unnecessary bulk.
Explore Gift Tags And Packaging Accessories →
FAQs
What Are The Key Features Of Premium Swing Tags?
Premium swing tags combine a suitable board, precise print, considered typography, a complementary attachment, and enough durability for the product journey. They should feel refined without becoming unnecessarily thick, heavy, or complicated.
How Can Board Weight Affect The Perceived Quality Of Swing Tags?
Board weight influences stiffness, handling, print performance, and how the tag hangs. The best choice depends on tag size, design, finish, and product. Heavier is not always better, particularly where a smaller or more delicate product needs a lighter visual touch.
What Materials Are Recommended For Lightweight Yet Durable Swing Tags?
The right material depends on the required finish, tag size, attachment, and handling conditions. Compare physical board samples and ask for documented information about composition, recycled content, certification, coatings, and recyclability.
How Do String Choices Affect The Overall Aesthetic?
String changes the texture, movement, colour balance, and perceived weight of a tag. Fine cord can feel minimal, while ribbon or textile string can create a softer or more decorative result. The attachment should suit the product as well as the brand.
What Role Do Tear-Resistant Hole Reinforcers Play?
Hole reinforcers help distribute tension and reduce tearing around the punched area. They may be useful for heavier tags, layered formats, softer boards, or products that will be handled repeatedly.
How Can Premium Swing Tags Support Sustainability Commitments?
Brands can evaluate board composition, recycled content, FSC-certified options, coatings, strings, reinforcers, minimum order quantities, and recyclability. All sustainability claims should be specific and supported by appropriate evidence.
What Design Elements Make Swing Tags More Instagram-Worthy?
Clear typography, balanced colour, tactile finishes, distinctive shapes, and considered placement can make a tag more photogenic. The tag should support the product and wider packaging rather than compete with them.
How Do Swing Tags Influence Customer Satisfaction?
A well-designed swing tag can make a product feel more considered, communicate useful information, and support a smoother unboxing experience. Poorly attached, difficult-to-remove, or confusing tags can have the opposite effect.
What Are The Best Practices For Regulatory Compliance?
Confirm the information required for each product and market, maintain approved copy, manage translations, control artwork versions, and review all claims with the appropriate legal or compliance team. Do not rely on the swing tag to carry information that belongs elsewhere without specialist review.
How Can Brands Balance Luxury Packaging With Operational Efficiency?
Use the lightest suitable board, limit unnecessary layers, select attachments that are quick to apply, standardise where practical, and test the complete specification with packing teams. A premium result should work at scale as well as in a sample review.
/* Blog only: prevents link/button/table/FAQ styles leaking across the website */
.premium-swing-tags-blog a:not(.pill-outline){
color: #30acd9 !important;
font-weight: 700 !important;
text-decoration: underline !important;
text-underline-offset: 3px;
}
/* Pill outline button */
.premium-swing-tags-blog .pill-outline,
.premium-swing-tags-blog a.pill-outline{
display: inline-flex;
align-items: center;
justify-content: center;
gap: 10px;
padding: 12px 26px;
border: 2px solid #111;
border-radius: 9999px;
background: transparent;
color: #111 !important;
text-decoration: none !important;
font-family: inherit;
font-weight: 700;
font-size: 12px;
line-height: 1;
text-transform: uppercase;
letter-spacing: 0.08em;
cursor: pointer;
user-select: none;
transition: background-color 160ms ease, color 160ms ease, transform 120ms ease;
}
.premium-swing-tags-blog .pill-outline__text{
color: inherit;
font-weight: 700;
text-decoration: none !important;
}
.premium-swing-tags-blog .pill-outline__arrow{
color: inherit;
text-decoration: none !important;
font-size: 14px;
line-height: 1;
transform: translateY(-0.5px);
}
.premium-swing-tags-blog .pill-outline:hover{
background: #111;
color: #fff !important;
text-decoration: none !important;
}
.premium-swing-tags-blog .pill-outline:hover .pill-outline__text,
.premium-swing-tags-blog .pill-outline:hover .pill-outline__arrow{
color: #fff !important;
text-decoration: none !important;
}
.premium-swing-tags-blog .pill-outline:active{
transform: translateY(1px);
}
.premium-swing-tags-blog .pill-outline:focus-visible{
outline: 2px solid #e9b448;
outline-offset: 3px;
}
/* Tables */
.premium-swing-tags-blog .table-wrap{
width: 100%;
overflow-x: auto;
border: 1px solid rgb(234, 232, 230);
border-radius: 18px;
background: #fff;
margin: 14px 0 26px 0;
}
.premium-swing-tags-blog .tb-table{
width: 100%;
border-collapse: collapse;
min-width: 780px;
font-family: Arial, sans-serif;
}
.premium-swing-tags-blog .tb-table thead th{
text-align: left;
font-weight: 700;
font-size: 14px;
padding: 14px 14px;
border-bottom: 1px solid rgb(234, 232, 230);
background: #fafafa;
white-space: nowrap;
}
.premium-swing-tags-blog .tb-table td{
font-size: 14px;
line-height: 1.5;
padding: 14px 14px;
border-bottom: 1px solid rgb(234, 232, 230);
vertical-align: top;
}
.premium-swing-tags-blog .tb-table tbody tr:last-child td{
border-bottom: none;
}
/* FAQ */
.premium-swing-tags-blog .faq{
width: 90%;
max-width: 900px;
margin: 0 auto 32px auto;
font-family: Arial, sans-serif;
}
.premium-swing-tags-blog .faq-title{
text-align: center;
margin: 0 0 14px 0;
font-size: 24px;
line-height: 1.3;
}
.premium-swing-tags-blog .faq-item{
border: 1px solid rgb(234, 232, 230);
border-radius: 25px;
background: #fff;
overflow: hidden;
margin: 10px 0;
}
.premium-swing-tags-blog .faq-item summary{
position: relative;
list-style: none;
cursor: pointer;
padding: 16px 56px 16px 18px;
font-weight: 700;
font-size: 16px;
line-height: 1.4;
outline: none;
user-select: none;
}
.premium-swing-tags-blog .faq-item summary::-webkit-details-marker{ display: none; }
.premium-swing-tags-blog .faq-item summary::after{
content: "\25B8";
position: absolute;
right: 18px;
top: 50%;
transform: translateY(-50%);
transition: transform 160ms ease;
font-size: 18px;
line-height: 1;
opacity: 0.8;
}
.premium-swing-tags-blog .faq-item[open] summary::after{
transform: translateY(-50%) rotate(90deg);
}
.premium-swing-tags-blog .faq-content{
padding: 12px 18px 18px 18px;
margin-top: 6px;
font-size: 15px;
line-height: 1.6;
color: #333;
border-top: 1px solid rgb(234, 232, 230);
background-color: #fff;
}
.premium-swing-tags-blog .faq-item summary:hover{ background: #fafafa; }
.premium-swing-tags-blog .faq-item summary:focus-visible{
outline: 2px solid #e9b448;
outline-offset: 2px;
border-radius: 18px;
}
@media (max-width: 600px){
.premium-swing-tags-blog .faq-title{ font-size: 22px; }
.premium-swing-tags-blog .faq-item summary{ font-size: 15px; padding: 14px 48px 14px 16px; }
.premium-swing-tags-blog .faq-content{ font-size: 14px; padding: 14px 16px 16px 16px; margin-top: 4px; }
.premium-swing-tags-blog .tb-table{ min-width: 720px; }
}